Overig / Notes
- Leerplein
- ROCvA
- Bookstack
- Youtube Videos
- Lesplanning - Max
- CamStudio
- Langs de Kromme Mijdrecht
- Scrum
- GIT - cheat sheet
- CheckList
- Ontkalken
- KT3 Upload website
- examen.ovh
- Backup DB
- Garmin
- Ostrogorski Paradox
- Running Numbers
- Mail alias in Google
- Nutriscore
- Slide Show Pictures (HTML/CSS en JS)
- python email merge
- Max-Quiz
- Wix
- PHP en GMAIL
- Brand-Brothers Forms
- SSH Checklist
- Books
- Grid View - Max MVC
- VU
- Weetjes / Quiz vragen
- Denken in Systemen
- Verkiezingen 2025
- Hoe een Economie Werkt: Het Eilandverhaal
- Klassiek versus Keynesiaans
- Kennis-Checks
- Versnellen
- Prompt - Atlas - CMON - nakijken
- Raspberry Pi2 Screen issues
Leerplein
Doel Leerplein
- leert zelfstandig te plannen en te werken volgens een planning;
- leert zelfstandig dingen uitzoeken (met behulp van informatie van het internet);
- leert samenwerken en elkaar helpen;
- huiswerk (af)maken.
Regels Leerplein
- Leerplein is verplicht.
- Leerplein is in de eerste plaats om je huiswerk te maken voor je AO/Software Development vakken.
- Als je de leerpleinuren anders wilt besteden dan is daar ruimte voor maar dat moet wel in overleg met de docenten en het dient in je planning (volgend punt) te worden opgenomen.
- Tijdens de leerpleinuren maak je een planning in Excel, zie bijlage.
In de planning plan je werk voor de komende drie uur.
Aan het eind van de drie uur bepaal je in hoeverre je je planning hebt gehaald. Dat vul je weer in.
Je planning lever je na elk leerplein-les in via Teams 'Leerplein'. Je planning en werkhouding tijdens de les wordt beoordeeld! - Tijdens leerplein werk je zelfstandig; als je er niet uit komt dan ga je zefl op onderzoek uit, daarna vraag je je klasgenoot en pas in de laatste plaats vraag je hulp aan één van de docenten.
- Als je al het AO huiswerk af hebt dan mag je: ander huiswerk maken, aan andere IT projecten werken of de AO docenten hebben extra plus werk.
--
ROCvA
Rooster koppelen aan Agenda
Hoe koppel ik mijn Rooster aan mijn ROCvA agenda?
- Ga naar EduArte Classic
- Onder Home, ga naar instellingen - Agenda
- Kopieer link (eventueel eerst key/sleutel genereren)
- Ga naar de online versie van Outlook
- Ga naar kalander
- Kies import kalender - Kies from Web
- Vul de gekopieerde link in en Geef de nieuwe kalender een naam.
Sync Issues
Als de koppeling niet werkt kan dat komen door een corrupte OST file.
Repareer dit door de mail en/of calendar folder in Outlook (lokaal) te repareren.
- Right-click the folder, and then click Properties.
- Click Clear Offline Items > OK.
- On the Outlook ribbon, click the Send/Receive tab.
- Click Update Folder.
--
Bookstack
Bookstack
roc.och dev omgeving: http://vps232189.ovh.net/bookstack/public
Bookstack commands
# Create a new admin user
php artisan bookstack:create-admin
# Delete all activity history from the system
php artisan bookstack:clear-activity
# Delete all page revisions from the system
php artisan bookstack:clear-revisions
# Delete all page revisions from the system including update drafts
php artisan bookstack:clear-revisions -a
# Delete all page views from the system
php artisan bookstack:clear-views
# Search and remove images that are not used in page content
php artisan bookstack:cleanup-images
# Generate SQL commands that will upgrade the database to UTF8mb4
# See https://www.bookstackapp.com/docs/admin/ut8mb4-support/
php artisan bookstack:db-utf8mb4
# Rebuild the search index
# Useful if manually inserting pages into the system
php artisan bookstack:regenerate-search
# Regenerate access permissions - Used mostly in development
php artisan bookstack:regenerate-permissions
# Delete all users from the system that are not "admin" or system users
php artisan bookstack:delete-users
# Copy the permission settings of a specified, or all, shelf to their child books
php artisan bookstack:copy-shelf-permissions --all
php artisan bookstack:copy-shelf-permissions --slug=my_shelf_slugSet rechten op directories (Centos)
chown -R apache:max ./public/uploads/images/
chown -R apache:max ./storage/uploads/files/
chmod -R 775 ./public/uploads/images/
chmod -R 775 ./storage/uploads/files/Set rechten op directories (Ubuntu)
chown -R www-data:max ./public/uploads/images/
chown -R www-data:max ./storage/uploads/files/
chmod -R 775 ./public/uploads/images/
chmod -R 775 ./storage/uploads/files/x
Youtube Videos
Alle video's ter ondersteuning van onderwijs ROC
Alles
https://www.youtube.com/playlist?list=PLBU_XXNTKkBoD2pUPw8GR8VF51mc0z67U
Alleen Linux
https://www.youtube.com/playlist?list=PLBU_XXNTKkBrehj5Tcax4itW85cY5xMSr
Alleen SQL
https://www.youtube.com/playlist?list=PLBU_XXNTKkBordjKWRgH5XqF7I9Z26Cn8
Alleen PHP
https://www.youtube.com/playlist?list=PLBU_XXNTKkBrJ2kDna9tAAEJPbJBFQlZ-
Lesplanning - Max
Laatste week Periode 3
ma 20-4
| 8A - PHP | Examens uitleggen - voorschot nemen naar nieuw rooster Cijfers Opdr 1: Code aanpassen -> Corona opdracht Opdr 2: Na de vakantie -> OOP, PDO CRUD |
| 9a - PHP | cijfers - Eindcijfer (overgang): huiswerk - mondeling - portfolio nieuw rooster uitleggen Opdracht Portfolio (uitleg site/Les) en Bankrekening (deadline) |
| 9B - PHP | |
| 9C - PHP |
di 21-4
| 9A IB - SQL | Socrative (extra) test Les Joins afmaken |
| 9B IB - SQL |
wo 22-4
| 8A - PHP | Huiswerk maken |
| 9a - PHP | Huiswerk maken |
| 9B - PHP | |
| 9C - PHP |
-- online lessen --
ma 12-3
| 9A - PHP | Bespreken huiswerk functies en inleiden nieuwe praktijkopdracht simulatie. Bespreken HW LInux 3.2 - opdracht 2f en opdracht 3 |
| 9B - PHP | Toets PHP 1.1 |
| 9A - PHP | Toets PHP 1.1 |
| IB9A - SQL | 3 nieuwe leerlingen HW verplicht!: Ali, Ayoub en Kamel Toets |
- week 7 -
vr 12-3
|
8A - Linux |
Uitleg HW PHP En Linux, komende week concentreren op PHP: 2 opdrachten Hoofdstedenspel en dobbelstenen (of indien gewenst bankrekeningnummer) |
| 9C Linux | uitval ivm Corona - Werken aan les install Apache en Virtual Server |
| 8A - Linux | uitval ivm Corona - zelfstandig werken en individuele hulp |
| 8A - PHP | uitval ivm Corona - zelfstandig werken en individuele hulp |
| 9C - PHP | uitval ivm Corona - Toets PHP 1.1 |
-- Nieuwe richtlijnen Covid-19 --
do 12-3
| 8A - PHP |
Functions 2a/b - unset array - "samen programmeren" via pseude code
|
| 9B - PHP |
6.4 Functions en Linux 4.1/4.2 |
| 9C - PHP |
Huiswerk nabespreken - demo - discipline Voorbespreken PHP Toets volgende week maandag
(PHP) 6.4 Functions (Linux) 4.1 en 4.2 - uitleg |
| 9ABC |
Leerplein |
wo 11-03
| 9B Linux |
Voorbespreken PHP Toets volgende week maandag
Huiswerk 3.1 opgave 3 bespreken Huiswerk 3.2 Opgave 2f en 3 en maar 7! Ingeleverd? Waarom?
4.1 Deze week 4.2 Volgende week - wordt afgetekend veel werk |
| 8B Mentorles | |
| IB9B SQL |
Toets bespreken Nieuwe leerlingen? -> HW? |
|
HW PHP 9C nakijken en voorbereiden voor morgen |
(searchtag planningmax roostermax rmax)
CamStudio
Voor het afnemen van toetsen is het nodig om een schermopname van de toets te laten zien.
Dit kan op verschillende manieren, hier wordt uitgelegd hoe dat kan met CamStudio.
CamStudio
Download and Install
Download de portabel versie: https://portableapps.com/downloading/?a=CamStudioPortable&n=CamStudio%20Portable&s=s&p=&d=pa&f=CamStudioPortable_2.7.2_English.paf.exe
"Installeer" de software, feitelijk wordt de software nu alleen uitgepakt.
Start de software op en configureer een paar zaken. Omdat de software niet is geïnstalleerd moet je via de verkenner/explorer zelf naar de juiste folder CamStudioPortable toe gaan en de CamStudioPortable.exe opstarten.
Configuratie
1. Zet de region op Full Screen.


4. Kies Options - Program Options - Name of Avi File - Automatic file naming

Opname maken
Druk op de rode record button om de opname te starten.

Druk op de blauwe stop button (rechts naast de record button) om de opname te stoppen.
--
Langs de Kromme Mijdrecht
Via Ouderkerk aan de Amstel of via de Ouderkerkerplas ga je naar Abcoude, bij Abcoude langs het spoor en uiteindelijk de weg langs het Amsterdam Rijnkanaal op richting het zuiden, Breukelen en Utrech).
Breukelen onder he spoor en A2


Bij Breukelen naar rechtsen dan de A2 onderdoor

Ventweg langs N401
Weg volgen tot aan rotonde

Vlak na de rotonde her dorpje Portengensebrug
Eerste links

Verlaten weg
Deze weg volgens en je komt dan langs een gemaal/sluisje (?) en dan op een weg langs een 'riviertje, de Geer. De Geer is links van je. Deze weg volgen. Ergens moet je nog een keer de N212 oversteken, rechtdoor en je volgt het water gewoon. Tot aan een de T-splitsing bij de witte brug aan de linkerkant, deze brug gaat over de Geer.
Witte brug de Geer over
Woerdense Verlaat, Amstelkade rechts

Nadat je rechts bent gegaan, de Amstelkade in Woerdense Verlaat
Scrum
Scrum Begrippenlijst
Het Scrumteam kent 3 rollen die elkaar complementeren in verantwoordelijkheden zodat er een optimale samenwerking kan worden bewerkstelligd.
Ontwikkelteam
Een zelf organiserend, multidisciplinair team, bestaande uit vijf tot negen leden, dat alle items op de product backlog ontwikkelt tot werkende (deel)producten.
Product Owner
Vertaalt alle klantwensen naar wat er geleverd moet worden. Hiervoor gebruikt de product owner de product backlog waarin zij bepaalt wat de hoogste prioriteit heeft.
Scrum Master
Faciliteert de product owner en het ontwikkelteam gedurende het proces. Zij zorgt ervoor dat iedereen begrijpt hoe scrum werkt en dat alle impediments (hobbels op de weg) die het proces vertragen en/of hinderen worden weggenomen.
Sprint meetings
Al het werk dat gedaan moet worden is georganiseerd in 4 herhalende sprints van ieder 2 weken per sprint.
Tijdens elke sprint vinden er 4 sprint meetings (ceremonies) plaats, die de mogelijkheid bieden om het proces voortdurend aan te passen aan de omstandigheden.
Sprintplanning
Elke sprint begint met een sprintplanning waarin de product owner de opdracht voor de sprint geeft en het ontwikkelteam het werk voor de sprint plant.
Daily Scrum
Een korte dagelijkse bijeenkomst van hooguit 15 minuten waarin het ontwikkelteam de voortgang en de obstakels bespreken.
Sprint Review
Aan het eind van de sprint presenteert het ontwikkelteam de resultaten en krijgt het feedback van betrokkenen, zoals klanten, managers en collega’s.
Sprint Retrospective
Ter afronding van de sprint wordt het proces geëvalueerd met als doel het proces te verbeteren met het oog op de volgende sprint.
Termen en Overzichten
Product backlog
een lijst van al het werk dat gedaan moet worden om een product te creëren en onderhouden. De product owner beheert en prioriteert de product backlog.
Sprint backlog
een overzicht van het geselecteerde werk uit de product backlog dat het ontwikkelteam wilt realiseren gedurende de aankomende sprint.
Definition of done
een lijst met vereisten waaraan een item van de sprint backlog moet voldoen om als voltooid te worden aangemerkt.
Scrumbord
een bord met 3 kolommen (soms 4): (‘Backlog’),‘to do’, ‘doing’ en ‘done’. Hierop worden de taken die op de sprint backlog staan (vaak in de vorm van post-its) weergegeven die door teamleden zijn opgepakt.
Sprint Burndown Chart
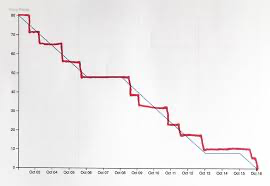
een grafiek met de voorraad werk per dag. Als het goed is, zie je een dalende lijn die aan het eidn van de sprint op 0 moet uitkomen.
User Story
Een user story is een korte beschrijving van een onderdeel van een product, beschreven vanuit het oogpunt van de eindgebruiker. Het heeft de structuur: Als (wie?), wil ik (wat?), zodat ik (waarom?).
GIT - cheat sheet
Install (Windows)
https://git-scm.com/
https://desktop.github.com/
set up new repo
(create git repo in web gui first)
git init
git add .gitignore
touch README.md
git add README.md
git remote add myOrigin git@github.com:maxbis/examengesprekken
git push -u origin masterssh key
add ~/.ssh/id_rsa.pub in git hub web guiadd file
git add <file name>update repo
git commit -a -m "comment"
git pushGet updated files
git pullOverwrite local changes
git reset --hard
git pullNew clone - install new
git clone https://github.com/maxbis/examengesprekken
// for Ubuntu server
sudo chgrp -R www-data examengesprekkenGo to older version
git reset --hard 0ad5a7a6.....Git clear cache (if ignore file is changed)
git rm --cached configList all tracked files
git ls-tree -r HEAD --name-onlyGit issues with .ignore
git rm -r --cached .
git add .
git commit -m "Stop tracking files that are now ignored"Init new repo
cd path/to/class-cloud
git init
git add .
git commit -m "Initial commit"
<create new repo on githib>
git remote add origin https://github.com/maxbis/class-cloud.git
git push -u origin master
<on Linux>
git clone https://github.com/maxbis/class-cloud.gitSet Remote Git && Check git remote
SSH key
ssh-keygen -t ed25519 -C "your_email@example.com"
eval "$(ssh-agent -s)"
ssh-add ~/.ssh/id_ed25519
cat ~/.ssh/id_ed25519.pub
git remote set-url origin git@github.com:USERNAME/REPO.git
git remote -vTest Connection
ssh -T git@github.comCheckList
Yii
1. XAMPP is recent - jun 2019 of nieuwer
2. PHP is maar één keer geïnstalleerd.
- check path variabele (cmd box 'path')
Er mag maar een verwijzing zijn naar een php directory.

Meer details zijn te vinden op: https://www.roc.ovh/books/yii/page/trouble-shooting-yii-installatie
3. Yii2 Model generator werkt
De model generator werk, http://localhost:8080/gii/model
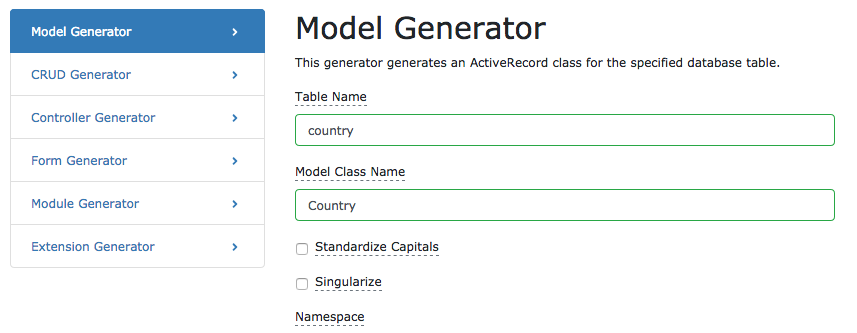
Vereisten: (1) Yii is geïnstalleerd, (2) XAMPP is up-to-date, (3) PHP van XAMPP wordt gebruikt (zie trouble shoot page), (4) database draait en (5) database is in Yii geconfigureerd en geïmporteerd (zie les 1)
ERD
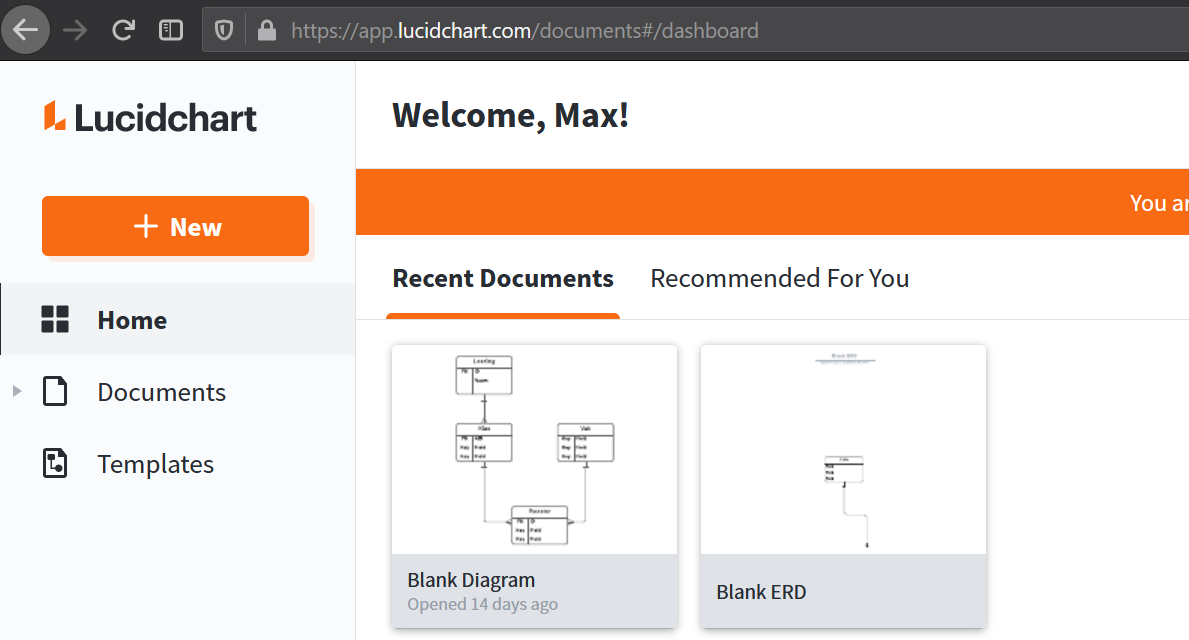
1. Iedereen heeft een login op Lucichart
Student mag andere tool gebruiken, dan graag noteren welke.
Functioneel Ontwerp
1. Wireframe
( Licence key voor desktop versie op verzoek via Teams verkrijgbaar )
2. Tool overzicht
Alles studenten dienen dit helder te hebben en wij moeten de voorbeelden afvinken.
| Wat | Hoe - Tool | Voorbeeld gezien |
| ERD voor TO | ||
| Wireframe voor FO (dat is grove schets v/d lay-out) | ||
| Uivoerontwerp; proto-type output scherm | ||
| Formulierontwerp; proto-type form (invoerscherm) | ||
| Navigatie structuur - flow diagram |
Zie instructie in les welke tool je kan gebruiken.
De keuze van tools is verder vrij, mits er wordt aangetoond dat de student in staat is de gevraagde diagrammen te maken.
--
Ontkalken
- filter verwijderen
- 100 ml (level A) onkalkingsmiddel + 1 liter water (level B)
- Stoompijpje en koffieruitloop onder grote bak
- Toets "druppels" onder stoomknop 5 sec indrukken
- Stoomlampje knippert -> stoomkraan open zetten
- ong. 25 m. wachten
- Lampjes (stoom en kannetje) knipperen - stoomkraantje uit - vers water - stoomkraantje weer aan
- Zelfde als stap 7 maar nu met filter
KT3 Upload website
Maak lijst met kandidaten in Excel, met alle studenten nummers en verzin/generate wachtwoorden.
Maak een text input file met userid's en passwords (gescheiden door spatie).
Scipts ran on Ubuntu Server VPS
SFTP restriction
in /etc/ssh/sshd_config (aan eind toevoegen).
Match Group sftp
ForceCommand internal-sftp
ChrootDirectory %h
AllowTCPForwarding no
PermitTunnel no
X11Forwarding noWerkt niet goed - uiteindelijk opgelost met standaard rechten:
drwxr-xr-x 14 root root 4096 Jul 26 2020 var/
drwxrwxr-x 9 root www-data 4096 Nov 30 10:28 www/
drwxr-x--x 78 max root 4096 Feb 4 21:12 softwaredeveloper/
drwxr-x--x 4 u515 sftp 4096 Feb 5 16:15 u515/
(group root werkt ook)
-rw-rw-r-- 1 u515 sftp 38 Feb 3 19:42 index.php
(group root werkt ook)
Note group sftp only needed if ssh restriction are apliedReadme
input file consists out of line with
<userid> <password>
add users
run addUser.sh <file>
run creatDBUsers.sql file; sudo mysql < createDB Users.sql
remove
run removeUser.sf <file>
go to php myadmin and delete dabases and users (no script but easy with gui)Script add users
#!/bin/bash
# Script to add a user to Linux system
# Params <user> <passw> or <file>
DB_FILE=createDBUsers.sql
addThisUser() {
if [ $(id -u) -eq 0 ]; then
echo "" >> $DB_FILE
if [ "$1" == "" ]; then
read -p "Enter username : " username
else
username=$1
fi
if [ "$2" == "" ]; then
read -s -p "Enter password : " password
else
password=$2
fi
egrep "^$username" /etc/passwd >/dev/null
if [ $? -eq 0 ]; then
echo "$username exists!"
exit 1
else
U_HOME=/var/www/softwaredeveloper/$username
U_GROUP=sftp
U_SHELL=/bin/bash
pass=$(perl -e 'print crypt($ARGV[0], "password")' $password)
useradd -d $U_HOME -g $U_GROUP -m -s $U_SHELL -p $pass $username
[ $? -eq 0 ] && echo "User $username has been added to system!" || echo "Failed to add a user!"
chown $username $U_HOME
echo "<?php echo \"welkom $username\"; ?>" > $U_HOME/index.php
chown $username $U_HOME/index.php
echo "" >> $DB_FILE
echo "CREATE USER \`$username\`@\`%\` IDENTIFIED BY '$password';" >> $DB_FILE
echo "ALTER USER \`$username\`@\`%\` REQUIRE NONE;" >> $DB_FILE
echo "CREATE DATABASE IF NOT EXISTS \`$username\`;" >> $DB_FILE
echo "GRANT ALL PRIVILEGES ON \`$username\`.* TO \`$username\`@\`%\`;" >> $DB_FILE
fi
else
echo "Only root may add a user to the system"
exit 2
fi
}
# is parameter is file then read input from file <user> Mpassword>
# else read two command line params
if test -f "$1"; then
while IFS= read -r line
do
addThisUser $line
done < $1
else
addThisUser $1 $2
fiscript del users
#!/bin/bash
# remove user, params <user> or <file>
removeThisUser() {
if [ $(id -u) -ne 0 ]; then
echo "Only root may add a user to the system"
exit 2
fi
if [ "$1" == "" ]; then
read -p "Enter username : " username
else
username=$1
fi
if [ $? -eq 0 ]; then
userdel -r $username
getent group $username || groupadd $username
U_HOME=/var/www/softwaredeveloper/$username
echo "Remove $U_HOME"
fi
}
# is parameter is file then read input from file <user>
# else read command line params
if test -f "$1"; then
while IFS= read -r line
do
removeThisUser $line
done < $1
else
removeThisUser $1 $2
fi
examen.ovh
Verwijderen resultaten uit examanresultaat
Dit doe je als er een kandidaat is beoordeeld die niet heeft meegedaan. Kandidaat moet volledig uit de uitslagenlijst.
DELETE FROM `results`
WHERE studentid in (48, 59, 52, 51, 55, 39, 34, 68,1)
AND formid=18
AND examenid=4In dit voorbeeld worden alle resultaten van de studenten met id's 48, 59,.... en het formulier id 18 verwijderd. Als je regel 3 weglaat dan worden alle uitslagen van alle formulieren van de student van het examen (in dit voorbeeld id-4) weggehaald.
Beoordelaar1/2 in batch wijzigen
De beoordeling wordt pas naar de beoordeling tabel gekopieerd als die is ge-saved. Op dat moment wordt het commentaar vanuit de forms ook in de beoordeling gekopieerd. Als je de beoordelaars van de gesaved-de beoordelingen wil wijzigen.
update uitslag u
inner join student s on s.id = u.studentid
set beoordeelaar2id = 16
where examenid= 4
and s.klas='8C'
and werkproces = 'B1-K3-W1'
Backup DB
Backup
- 5x per dag wordt een dump van de database op de server gemaakt. -> cron job
- Oude back-up worden verwijderd, de 23:10 back up wordt 400 dagen bewaard,
de andere worden eerder verwijderd. - Elk dag wordt via rsync en ssh (via public/privat keys) de hele document root plus alle database dumps gekopieerd. Script wordt geïnitieerd door NAS.
- Een controle script - nog niet geïmplementeerd.
NAS
Cron job draait om 11:10, 14:10, 17:10, 20:10 en 23:10. Er worden dus 5 DB dumps per dag gemaakt.
# create backup of Bookstack Database
10 23,20,17,14,11 * * * /home/max/mysql/backupDB.sh > /home/max/mysql/backupDB.log 2>&1Backup Script plus clean up
Script backupDB.sh voor backup
#!/bin/bash
export PATH=/bin:/usr/bin:/usr/local/bin
TODAY=`date +"%d%b%Y"`
TODAY=`date +"%m%d-%H00"`
################################################################
################## Update below values ########################
DB_BACKUP_PATH='/home/max/mysql/Backup-DB'
MYSQL_HOST='localhost'
MYSQL_PORT='3306'
MYSQL_USER='user'
MYSQL_PASSWORD='secret'
DATABASE_NAME='sb_name'
BACKUP_RETAIN_DAYS=180 ## Number of days to keep local backup copy
#################################################################
echo "Backup started for database - ${DATABASE_NAME}"
mkdir -p ${DB_BACKUP_PATH}
mysqldump -h ${MYSQL_HOST} \
-P ${MYSQL_PORT} \
-u ${MYSQL_USER} \
-p${MYSQL_PASSWORD} \
${DATABASE_NAME} | gzip > ${DB_BACKUP_PATH}/${DATABASE_NAME}-${TODAY}.sql.gz
if [ $? -eq 0 ]; then
# remove all files older than 400 days
find ${DB_BACKUP_PATH} -type f -not -name '*.sql.gz' -mtime +400 -exec rm {} \;
# remove all files older than 90 days excpet those made on the 1ste of the month
find ${DB_BACKUP_PATH} -type f -not -name '*01-????.sql.gz' -mtime +90 -exec rm {} \;
# remove all files not created ar 23:00 and older than 10 days
find ${DB_BACKUP_PATH} -type f -not -name '*300.sql.gz' -mtime +10 -exec rm {} \;
echo "Database backup successfully completed"
else
echo "Error found during backup"
exit 1
fi
##### Remove backups older than {BACKUP_RETAIN_DAYS} days #####
find ${DB_BACKUP_PATH}/* -mtime +${BACKUP_RETAIN_DAYS} -exec rm {} \;NAS Script
(let op dat niet-standaard poorten worden gebruikt ivm security)
TARGET=/volume1/archives/1/
mkdir -p $TARGET/server/var/www
mkdir -p $TARGET/server/home/abc
nohup rsync -av -e 'ssh -p 9999' servername.domain.net:/var/www/* $TARGET/server/var/www &
nohup rsync -av -e 'ssh -p 9999' servername.domain.net:/home/abc/ $TARGET/server/home/abc &
Garmin
Hard reset:
https://www.youtube.com/watch?v=-8vWGDOrn_Q
Ostrogorski Paradox
Ik laat aan de hand van een voorbeeld zien dat als er in een democratie wordt gekozen op een partij en daarmee op een compleet partij-programma, er een verkeerd beeld kan ontstaan van de "wil van de kiezer". Deze verstoring zou niet bestaan als de kiezer per onderwerp zou stemmen.
Deze verstoring heeft niets te maken met coalitievorming. Ik werk een voorbeeld uit waarin twee partijen met de verkiezingen meedoen.
Stel je hebt twee partijen de PP = Progressieve Partij en de CP = Conservatieven Partij.
Stel er zijn drie belangrijke onderwerpen, economie (ec), milieu (env) en Europese samenwerking (eur). Stel voor het gemak dat alle onderwerpen even zwaar wegen.
Dit is wat de partijen willen:
| Onderwerp | PP, Progressieve partij | CP, Conservatieve partij |
| Economie | hervormen (1) | zo houden als het is (0) |
| milieu | hervormen (1) | huidig beleid voortzetten (0) |
| Europese Samenwerking | meer politieke integratie (1) | houden zoals het is (0) |
De keuzes hervormen of niet worden in het kort weergegeven door 1 of 0.
Er zijn 5 kiezers en die hebben de volgende voorkeuren:
| Economie | Milieu | Europese Samenwerking | Stemt (dus)op | |
| Kiezer 1 | 0 | 1 | 0 | CP |
| Kiezer 2 | 0 | 1 | 0 | CP |
| Kiezer 3 | 1 | 0 | 0 | CP |
| Kiezer 4 | 1 | 1 | 1 | PP |
| Kiezer 5 | 1 | 1 | 0 | PP |
| Uitslag | CP wint |
Alleen kiezer 4 en 5 stemmen op de PP omdat zij beiden voor de meerderheid van de onderwerpen het beste passen bij de PP. Bijvoorbeeld kiezer 5 vind voor twee van zijn idealen aansluiting bij de PP en voor maar één bij de CP. Let wel alle onderwerpen tellen even zwaar.
Voor kiezer 1,2 en 3 geldt andersom dat zij de meeste aansluiting vinden bij de CP.
| Kiezer 1 | CP | overeenstemming 2/3 punten |
| Kiezer 2 | CP | overeenstemming 2/3 punten |
| Kiezer 3 | CP | overeenstemming 2/3 punten |
| Kiezer 4 | PP | overeenstemming 3/3 punten |
| Kiezer 5 | PP | overeenstemming 2/3 punten |
Dus de meeste keizers zullen als zij volledig rationeel kiezen, kiezen voor de CP. De CP wint met 3 tegen 2 stemmen.
"Case closed" of niet?
Laten we per onderwerp eens gaan bekijken hoe de stand is:
| Economie | Milieu | Europese Samenwerking | ||
| Kiezer 1 | 0 | 1 | 0 | |
| Kiezer 2 | 0 | 1 | 0 | |
| Kiezer 3 | 1 | 0 | 0 | |
| Kiezer 4 | 1 | 1 | 1 | |
| Kiezer 5 | 1 | 1 | 0 | |
| Uitslag - voorkeur |
PP | PP | CP | PP wint |
- De meerderheid (kiezer 3, 4, en 5) wil de economie hervormen (3 tegen 2). Zij zouden op dit punt kiezen voor de PP.
- Een ruime meerderheid (kiezer 1, 2, 4 en 5) wil het milieu hervormen (4 tegen 1). Zij zouden op dit punt kiezen voor de PP.
- De meerderheid wil de Europese samenwerking niet hervormen (4 tegen 1). Zij zouden op dit punt kiezen voor de CP.
Voor 2 van 3 punten wil de meerderheid dus het beleid van de PP. Het zou dus in het belang van iedereen zijn als de PP zou winnen in de verkiezingen omdat dan de meeste wensen van de kiezers dan worden uitgevoerd. De meerderheid is het immers op 2 van de 3 onderwerpen eens met de PP. Als iedereen rationeel stemt dan wint echter de CP.
Dus in deze denkbeeldige vereenvoudigde situatie waarin iedereen rationeel zou handelen, zou de partij winnen die opgeteld per onderwerp niet de meerderheid zou vertegenwoordigwoordigen.
Dit is slechts een vereenvoudigd voorbeeld met 3 issues en 2 partijen, maar ook in een complexere situatie geldt hetzelfde. Als de kiezers stemmen op de partij die het meest bij hun past, dan kan er als je alle issues zou optellen en eventueel zou wegen een verkiezingsuitslag komen die niet optimaal is voor de gemiddelde kiezer.
Dus deze paradox laat zien dat er een vervorming van de "wil van de kiezer" kan ontstaan als er gekozen wordt op een compleet partij-programma in plaats van dat er op aparte onderwerpen zou worden gekozen.
of in het Engels (quote van second.wiki):
The paradox shows that there can be strong distortions of the “will of the electorate” in elections and votes when votes are taken on entire party programs and not (separately) on individual issues.
Bronnen
www.pigozzi.org/Episteme_Pigozzi.pdf
https://second.wiki/wiki/ostrogorski-paradox
--
Running Numbers
Gewicht
Op de 10KM scheelt elke kilo meer gewich iets meer dan 30 seconden.
| Weight | Estimated Time | Time Difference |
|---|---|---|
| 67kg | 42:23 | - 02:37 |
| 68kg | 42:55 | - 02:05 |
| 69kg | 43:26 | - 01:34 |
| 70kg | 43:58 | - 01:02 |
| 71kg | 44:29 | - 00:31 |
| 72kg | 45:00 | - |
| 73kg | 45:31 | + 00:31 |
| 74kg | 46:02 | + 01:02 |
| 75kg | 46:33 | + 01:33 |
| 76kg | 47:04 | + 02:04 |
| 77kg | 47:35 | + 02:35 |
Gewicht schoenen
Elke 100 gram scheelt iets minder dan 1% snelheid.
Caloriegebruik
Aantal kilometer X gewicht ~ calorie gebruik.
Calculators: https://runbundle.com/tools/
Mail alias in Google
Het werkt als volgt.
Ga naar ‘tandwieltje’/settings
Account and Import
Add another email address (waar we ook zaten)
Vul in:
smtp.google.com
jouw email, dus laura.bisschop@gmail.com
wachtwoord (alleen als je geen 2FA aan hebt staan, anders lees verder hieronder)dan wachtwoord als je GEEN 2FA aan hebt staan (2FA is twee factor authenticatie).
Heb je wel 2FA aan staan dan wordt het lastiger:
In een ander window click op google-account (op je fotootje).
Manage your google account
(links) Security (4de optie?)
Dan onder signing in to Google, App password
(opnieuw aanloggen)
select een app en een device (beiden zijn puur een label, dus verzin wat).
Dan druk je op generate en je krijgt een wachtwoord:
Dat ziet er zo uit:
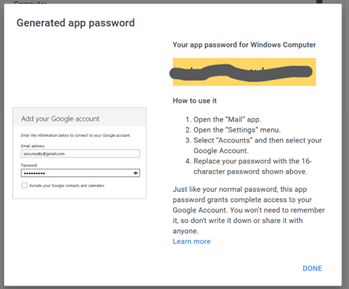
Dat wachtwoord in dat gele vlak kun je dan copy/past en dat is jouw wachtwoord voor in dat andere window.
Bewaar dit wachtwoord even, want het gaat soms mis (de smtp server is vaak druk).
Probeer het dus opnieuw als het niet lukt.
Uiteindelijk lukte het, dan krijg je een window voor een verificatie-code. Die krijg je in 1 a 2 minuten via mail.
Success!
Niet vergeten.....
O ja en als alles werkt dan kun je dat (tijdelijke) wachtwoord weer beter weghalen. Het is niet meer nodig. Het was alleen nodig voor de verificatie email.
Wachtwoord kun je weghalen op dezelfde plaats als waar jehet hebt aangemaakt. Spreekt voor zich: gewoon op het prullenmandje clicken.
Nutriscore
De berekening van de Nutriscore
Er zijn op landniveau verschillen voor bepaalde productgroepen zoals kazen, olijfolie, ....
Stap 1, negatieve- en positieve punten
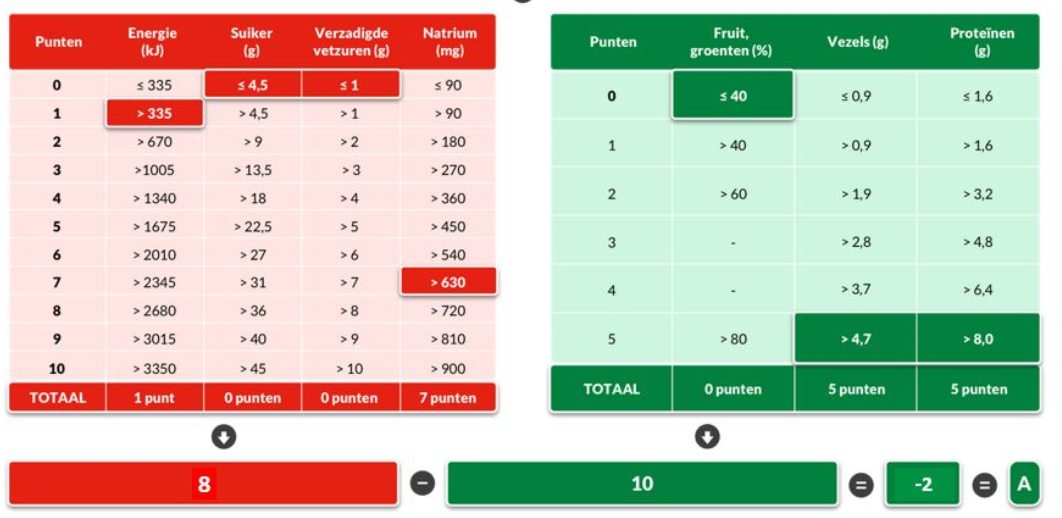
Bron: https://blog.has.nl/voedselkeuzelogo-2-het-nutri-score-algoritme/
Stap 2, punten omzetten in score
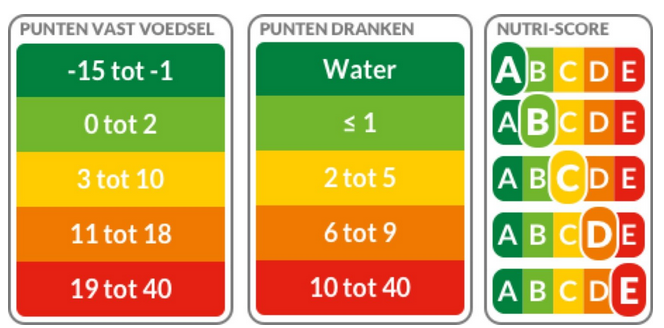
Bron: https://www.colruytgroup.com/en/conscious-consuming/nutri-score
Slide Show Pictures (HTML/CSS en JS)
Hoe maak je een slide show?
Opacity
Je hebt 4 images en via de CSS heeft elke img een opacity van 0 en is daarmee doorzichtig.
Class Active
Het enige plaatje dat je ziet, is het plaatsje dat via de class active een opacity van 1 heeft gekregen.
Javascript
Het JavaScript zorgt ervoor dat het plaatje de class active wordt weggehaald (remove) en dat het volgende plaatje de class active krijgt.
Via de transition in de CSS wordt de overgang van het ene naar het andere plaatje op 0.5 seconden gezet. Het JS loopt oneindig door en ververst elke 3000 ms (=3 seconden) het plaatje.
HTML
<!DOCTYPE html>
<html lang="en">
<head>
<meta charset="UTF-8">
<meta name="viewport" content="width=device-width, initial-scale=1.0">
<title>Rotating Images</title>
<link rel="stylesheet" href="styles.css">
</head>
<body>
<div class="slideshow">
<img src="image1.jpg" alt="Image 1" class="active">
<img src="image2.jpg" alt="Image 2">
<img src="image3.jpg" alt="Image 3">
<img src="image4.jpg" alt="Image 4">
</div>
<script src="script.js"></script>
</body>
</html>CSS
.slideshow {
position: relative;
width: 300px; /* Adjust based on your image's width */
height: 200px; /* Adjust based on your image's height */
overflow: hidden;
}
.slideshow img {
position: absolute;
top: 0;
left: 0;
width: 100%;
height: 100%;
opacity: 0;
transition: opacity 0.5s;
}
.slideshow img.active {
opacity: 1;
}
JavaScript
let currentImageIndex = 0;
const images = document.querySelectorAll('.slideshow img');
const totalImages = images.length;
setInterval(() => {
// Hide the current image
images[currentImageIndex].classList.remove('active');
// Move to the next image or loop back to the first one
currentImageIndex = (currentImageIndex + 1) % totalImages;
// Show the new current image
images[currentImageIndex].classList.add('active');
}, 3000); // Change the images every 3 seconds
python email merge
What it does
- Reads data from a CSV file.
- Uses the column named "email" from teh CSV file as the to: address.
- Replaces placeholders in the email text and subject line with corresponding data from the CSV file.
- Sends each customized email through Microsoft Outlook.
How it works
Replace 'your_file.csv', standard_email_text, and standard_subject with your actual file path and text. The script reads the CSV file, replaces placeholders in the email text and subject line with the corresponding data, and sends the emails.
What you need
- You need to have Microsoft Outlook installed on your system.
- This script assumes the CSV file is well-formed and the headers match the placeholders.
- Python's
win32com.clientlibrary is used for interacting with Outlook, which is Windows-specific. - @Line 28 the standard Excel delimiter is specified, this is depending on local settings and is either , or ;
Example

If the body text contains _index_, _name_, _ leeg_ or _URL_ these are replaced with the values in the corresponding lines. The search and replace is case-sensitive!
Set Outlook to work offline and check the email in the outbox before going back online!
Python Script
import csv
import win32com.client as win32
import sys
# Define your standard email text and subject line here
standard_email_text = """Beste _name_,
Hierbij de persoonlijke link waarmee u de voortgang van _name_ kan volgen:\n_URL_.
Voor het afronden van de studie binnen drie jaar, moeten dit schooljaar 8 blokken worden afgerond.
Groet, ...............
(deze email is automatisch gegenereerd)
"""
standard_subject = "voortgangsmonitor _name_"
# Function to send email via Outlook
def send_email(recipient, subject, body):
outlook = win32.Dispatch('outlook.application')
mail = outlook.CreateItem(0)
mail.To = recipient
mail.Subject = subject
mail.Body = body
mail.Send()
# Reading CSV and sending emails
with open('ouderemailC23 .csv', newline='', encoding='utf-8-sig') as csvfile:
reader = csv.DictReader(csvfile, delimiter=';')
for row in reader:
if ( row['email'] == "" ): # no email, skip
continue
email_body = standard_email_text
email_subject = standard_subject
email_to = row['email']
# Replace placeholders in the email text and subject
for key in row:
email_body = email_body.replace(f'_{key}_', row[key])
email_subject = email_subject.replace(f'_{key}_', row[key])
print(f"To: {email_to}")
print(f"Subject: {email_subject}")
print(f"{email_body}\n")
print("-----------------------------------------\n")
# Send the email
send_email(row['email'], email_subject, email_body)Max-Quiz
Use Case
In a classroom, as a teacher, I want to execute a formative assessment. I want to be able to start a quiz, minimize the change that students help each other and I want to be able to change quizzes, create new ones without much hassle.
Furthermore, I want to monitor the quiz once it is running and I want to be able to spot irregularities during the quiz session.
The commercial product Socrative matches this use case pretty well, but I kept on running into limitations. So I made my own quiz app.
Installation
Clone the repo
git clone https://github.com/maxbis/max-quiz
Update with composer
composer update
Database
Install the MySQL database by importing the file max-quiz-database-plus example_data.sql, note that this files also creates the database for you. If you want to name the database different, please edit the SLQ file.
Create and/or set rights to some directories
Depending on the system you are running on, you might need to create a few directories, since empty directories are not copied with GitHub. Maybe you need to set the file/directory rights, but this depends on your system and your Web server settings.
The framework Yii will give pretty clear hints for this.
The Yii app can be opened by navigating to the web directory, all routes mentioned in this document are relative to this directory.
Students view

The app starts by navigation to the web directory.
If you are not logged in you get a screen to start a quiz, this is the student's view.
A student need to provide his name, class and a password to start the quiz.
Student session
Once a student is started. He will always get the next unanswered questions. You can refresh the page, or do whatever. The sessions kept in a cookie that is valid for 2 hours. This is also the maximum time a student can work on a quiz.
When for what reason the student looses his session (he switched from device a to device b), you can provide the student a link to continue to finish the quiz.
Admin
Go to the login, by navigating to /admin.
The standard database has one admin account, called admin with the password admin.
The management of the users is all standard Yii: navigate to /tbl-user to manage this.
For now only username and password are used.
Quiz Screen
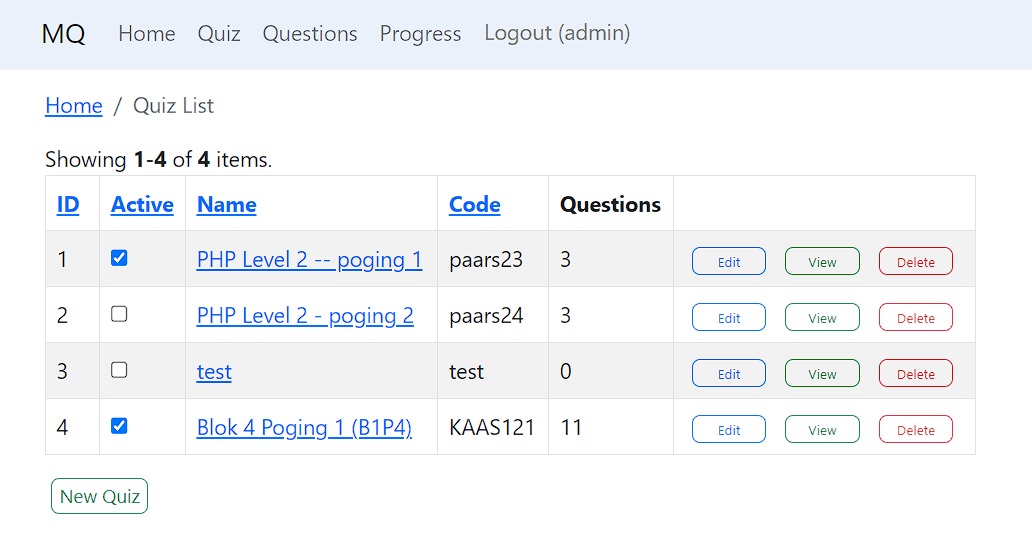
In the quiz screen you can manage the quizzes. Only active quizzes can be started.
Once a quiz is started, it can only be forced to be stopped on a student level.
Progress Screen
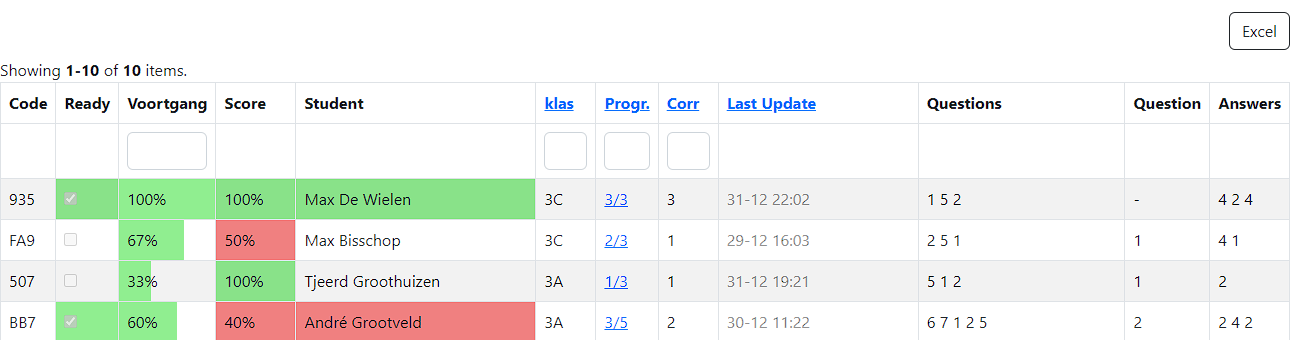
Here you can monitor the progress of the quiz. The questions are mixed per student.
By pressing on the progress column ("Progr."), you can edit the submission. You can change the name, class, correct the score, and force the quiz to be finished.
The code in shown in the left column helps to identify a user, since the code is printed in the header of the students working on the quiz.
One all students are finished, you can export the results to Excel.
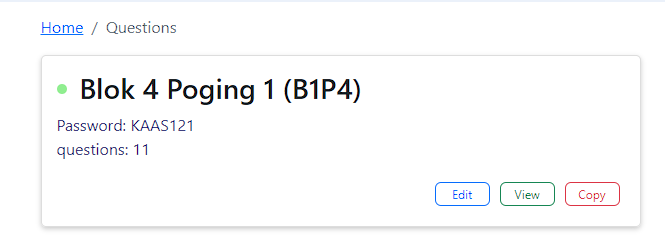
Questions Screen
In this screen you get a grid with all question. Here you can link/unlink questions to a quiz.
Use the search bars (question and label) to select questions and add these to the quiz.

View complete quiz
On the questions screen, the first part shows the quiz data. The green dot means the quiz is active.
Import/export Questions
From this screen you can go to import and export where you can import/export questions.
The format used is shown in the import screen and can also be seen when exporting a series of questions. Note that only the linked question of the quiz will be exported.
When the optional ID is provided in an import, you can update questions via import/export. Of course, you can also use the GUI.
--
Wix
Een veld op een form op "hidden" zetten.
Als je in de form editor op een veld klikt dan kan je aan de rechterkant de checkbox hidden aan klikken:
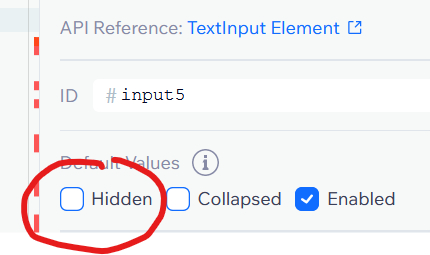
Op het form dat de gebruiker ziet, is dit veld dan niet meer zichtbaar.
Via script kan je het veld een waarde geven. In developer mode zie je onderaan een script.
Dit script is standaard 'leeg' en bevat alleen het begin en eind (hetgeen in het voorbeeld hieronder op regel 1 en 4 staat). Een regel die begint met // is een commentaarregel. In het voorbeeld hieronder zijn de commentaarregels verwijderd.
w.onReady(function () {
$w("#input5").value = "Hidden informatie";
$w("#hidden02").value = "Dit is een test";
});Bovenstaande code zet de waarde van twee velden. Het veld dat hierboven op hidden is gezet heeft een ID #input5 en de waarde wordt "Hidden informatie" (regel 2 van de code). Een ander veld met het ID #hidden02 krijgt ook een waarde op regel 3. Op deze manier kan je elk veld een waarde geven.
--
PHP en GMAIL
In (any) project directory:
composer require phpmailer/phpmailerCreate app password in Google
google account - security 0 2-Step Verification - App passwords
emailer
PHP code (this will accept a posted form and email all form fields).
<?php
use PHPMailer\PHPMailer\PHPMailer;
use PHPMailer\PHPMailer\Exception;
require 'vendor/autoload.php';
// Your Gmail credentials
$gmailUsername = 'user-name@gmail.com';
$gmailPassword = '16-char-app-password'; // under 2 FA in google account settings
// Recipient email address
$recipientEmail = 'to-user@server.com';
if ($_SERVER["REQUEST_METHOD"] == "POST") {
$emailContent = "Form Submission:\n\n";
foreach ($_POST as $key => $value) {
$emailContent .= "$key: $value\n";
}
$mail = new PHPMailer(true);
try {
// Server settings
$mail->isSMTP();
$mail->Host = 'smtp.gmail.com';
$mail->SMTPAuth = true;
$mail->Username = $gmailUsername;
$mail->Password = $gmailPassword;
$mail->SMTPSecure = PHPMailer::ENCRYPTION_STARTTLS;
$mail->Port = 587;
// Recipients
$mail->setFrom($gmailUsername, 'Form Submission');
$mail->addAddress($recipientEmail);
// Content
$mail->isHTML(false);
$mail->Subject = 'New Form Submission';
$mail->Body = $emailContent;
$mail->send();
echo 'Message has been sent';
} catch (Exception $e) {
echo "Message could not be sent. Mailer Error: {$mail->ErrorInfo}";
}
}
?>
Form example
<!DOCTYPE html>
<html lang="en">
<head>
<meta charset="UTF-8">
<meta name="viewport" content="width=device-width, initial-scale=1.0">
<title>Form Submission</title>
</head>
<body>
<form action="process_form.php" method="post">
<label for="name">Name:</label>
<input type="text" id="name" name="name"><br><br>
<label for="email">Email:</label>
<input type="email" id="email" name="email"><br><br>
<label for="message">Message:</label>
<textarea id="message" name="message"></textarea><br><br>
<input type="submit" value="Submit">
</form>
</body>
</html>Brand-Brothers Forms
Nieuwe locatie
https://www.roc.ovh/books/brand-brothers
Handleiding
Deze handleiding beschrijft de verschillende parameters die je kunt gebruiken bij het configureren van een bier selectie formulier.
Het form wordt aangeroepen door middel van een URL en alle parameters worden in de URL meegegeven.
Voorbeeld:
https://....../.../brand-brothers/forms/?eigenaar=naam&merk=Texels&set=Texels-vuurtorenbar&minbeers=3&beerfilter=amstel&options=1,2,3,4,25,26&t=1&maxbeers=3Spaties in URL
In de gehele URL moeten spaties worden gecodeerd als %20.
Parameters
De parameters zoals in het voorbeeld getoond, worden hieronder beschreven. Elke parameter is rood gemarkeerd.
minbeers
- Beschrijving: Het minimaal aantal bieren dat geselecteerd moet worden.
- Werking: Als er minder bieren zijn geselecteerd dan het minimum, krijg je een waarschuwing wanneer je probeert het formulier te versturen.
maxbeers
- Beschrijving: Het maximaal aantal bieren dat geselecteerd kan worden.
- Werking: Als je meer bieren selecteert dan het maximum, verschijnt er onmiddellijk een waarschuwing.
Verborgen Velden
- Beschrijving: De volgende velden zijn verborgen en kunnen via de URL worden meegegeven. De verborgen velden worden dor het formulier meegestuurd en verschijnen in de email.
- eigenaar: De eigenaar van het biermerk.
- merk: De naam van het biermerk.
- set: De naam van de set die in de titel van het formulier verschijnt.
t (Testmodus)
- Beschrijving: Hiermee kun je de testmodus van het formulier instellen. aan t kunnen de volgende waarden worden gegeven:
- 0: Normale werking (dezelfde als geen waarde opgegeven).
- 1: Alle verplichte velden zijn niet meer verplicht en het formulier wordt niet per e-mail verzonden.
- 2: Alle verplichte velden zijn niet meer verplicht en het formulier wordt wel per e-mail verzonden
options
- Beschrijving: Een lijst van opties die als een komma-gescheiden lijst moeten worden opgegeven. Deze opties worden getoond op het formulier.
beerfilter
- Beschrijving: Een filter om bieren op naam te selecteren.
- Werking: Als de waarde 'none' is, wordt de gehele bierselectie niet getoond. Je kunt meerdere filters specificeren, bijvoorbeeld:
beerfilter=amstel,brand.
Options aanpassen
Om options aan te passen kan deze URL worden gebruikt:
https://....../.../brand-brothers/forms/optionsof nieuwe interface
https://....../.../brand-brothers/forms/options/index2.phpOptienummer
Elke optie heeft een nummer. Aan de hand van dit nummer wordt de optie op het formulieer geplaatst. De nummers hoeven niet uniek te zijn. Wanneer meerdere opties hetzelfde nummer hebben, worden alle opties op het fomrulier getoond wanneer deze optie wordt gekozen.
Optienaam
De naam van de optie is de naam die op de aanvraag verschijnt (email).
Optielabel
Het label is de de naam zoals die op het formulier verschijnt.
Extra naam
De extra naam is de (open) vraag die wordt gesteld indien de optie wordt geslecteerd. De naam is de naam zoals die op het aanvraag (email) verschijnt.
Extra label
Het extra label is de (open) vraag die wordt gesteld indien de optie wordt geslecteerd. Het label is de naam zoals die op het formulier verschijnt.
URL naar options (back-up)
De 'database' waarin de options worden opgeslagen kun je via de volgende URLs controleren:
https://.../.../brand-brothers/forms/options/options.js
https://.../.../brand-brothers/forms/options/options.jsonDeze bestanden zou je ook als (extra) back-up kunnen gebruiken.
De twee bestanden bevatten dezelfde informatie, maar zijn om technische redenen op een andere wijze vormgegeven.
Options kunnen niet worden aangepast?
Als de opties niet kunnen worden aangepast, controleer dan de twee bestanden. Zijn de wijzigingen in deze bestanden wel aangepast dan zorgt de cache van de browser ervoor dat de wijzigingen niet (direct) worden getoond. Laadt de pagina dan opnieuw en leeg de browser cache (dit werkt op elke browser anders).
Beers aanpassen
(dit is nog nooit in productie getest)
https://............/brand-brothers/forms/beersof nieuwe interface
https://............/brand-brothers/forms/beers/index2.phpEen beer heeft een ID en een naam zoals dat op het form te zien is. Zorg ervoor dat de ID's uniek blijven.
Equipmentlist
(in ontwikkeling)
https://..../brand-brothers/equipment-list/folders.php--
SSH Checklist
SSH Key Setup Checklist
-
Generate SSH Key Pair
- Ensure that you have generated an SSH key pair on the client machine (
system a).- Run the following command and check for the existence of
~/.ssh/id_rsa(private key) and~/.ssh/id_rsa.pub(public key):ls -l ~/.ssh/id_rsa ~/.ssh/id_rsa.pub
- Run the following command and check for the existence of
- If the keys do not exist, generate them using:
ssh-keygen -t rsa -b 4096 - Ensure the keys have appropriate permissions (600 for private and 644 for public keys):
chmod 600 ~/.ssh/id_rsa chmod 644 ~/.ssh/id_rsa.pub
- Ensure that you have generated an SSH key pair on the client machine (
-
Copy Public Key to Remote Server
- Ensure that the public key has been copied to
system band appended to the~/.ssh/authorized_keysfile.- Use the
ssh-copy-idcommand to copy the key:ssh-copy-id username@system_b - Alternatively, you can manually copy the contents of
~/.ssh/id_rsa.pubto~/.ssh/authorized_keysonsystem b.
- Use the
- Verify that the
authorized_keysfile has the correct permissions:chmod 600 ~/.ssh/authorized_keys - Make sure the
.sshdirectory has the correct permissions:chmod 700 ~/.ssh
- Ensure that the public key has been copied to
-
Check SSH Daemon Configuration on Remote Server
- Ensure the SSH daemon is configured to allow key-based authentication. Check
/etc/ssh/sshd_configonsystem bfor the following settings:PubkeyAuthentication yesAuthorizedKeysFile .ssh/authorized_keysPasswordAuthentication no(optional, for enforcing key-based auth only)
- Restart the SSH daemon to apply changes:
sudo systemctl restart sshd
- Ensure the SSH daemon is configured to allow key-based authentication. Check
-
Verify Ownership and Permissions
- Check ownership and permissions of the user's home directory on
system b:- Ensure that the home directory and
.sshdirectory are owned by the user and have appropriate permissions:chown -R username:username /home/username chmod 700 /home/username/.ssh
- Ensure that the home directory and
- Check ownership and permissions of the user's home directory on
-
Ensure Correct SSH Command Usage
- Use the correct username and hostname when attempting to SSH into
system b:ssh username@system_b - If using a non-standard SSH port, specify it using the
-poption:ssh -p <port_number> username@system_b
- Use the correct username and hostname when attempting to SSH into
-
Check SSH Agent (Optional)
- Ensure that the SSH agent is running and the key is added to it, especially if using
ssh-agentfor key management:eval "$(ssh-agent -s)" ssh-add ~/.ssh/id_rsa - Verify the keys added to the agent:
ssh-add -l
- Ensure that the SSH agent is running and the key is added to it, especially if using
-
Review SSH Debugging Output
- Use the
-voption with the SSH command to enable verbose mode, which can provide detailed debugging information:bashssh -v username@system_b - Look for lines indicating whether the key is being offered and any errors that may indicate why the key is being rejected.
- Use the
-
Network Issues
- Ensure there are no network issues preventing the connection. Check that
system bis reachable via the network. - Verify that the firewall on
system bis allowing incoming SSH connections on the specified port.
- Ensure there are no network issues preventing the connection. Check that
-
SELinux and AppArmor (Linux Specific)
- If
system buses SELinux, ensure it is not blocking SSH connections:sudo setenforce 0 # Temporarily disable for testing - If using AppArmor, check that it allows SSHD to read the authorized_keys file.
- If
-
Check for Multiple Keys (Optional)
- If multiple keys are present, specify the exact key to use:
ssh -i ~/.ssh/id_rsa username@system_b
- If multiple keys are present, specify the exact key to use:
By following this checklist, you should be able to identify and resolve most issues preventing SSH key-based authentication. If problems persist, examining the verbose output from the SSH command can provide further clues.
Books
-
Black Heart (2018) - read
The first book introduces Detective Dan Riley as he investigates the brutal murder of a woman found dead in a luxury hotel suite. As the investigation unfolds, dark secrets emerge, leading to a web of lies, obsession, and revenge. A thrilling police procedural with psychological elements. -
The Couple on Cedar Close (2019) - read
This novel centers around a seemingly perfect couple, until the wife is found dead and the husband becomes the prime suspect. Detective Riley must dig deeper into their lives to uncover shocking truths that no one saw coming. -
The Stranger's Wife (2020) - read
In this book, two women from vastly different lives find themselves linked by a series of tragic events. Riley works to solve a complex case involving abuse, betrayal, and a violent crime, with plenty of twists and turns along the way. -
The Woman Inside (2021) - read
After surviving a near-fatal attack, Daisey Garrett wakes up in the hospital with no memory of what happened. With the help of Detective Riley, she attempts to piece together the events of that night, while her troubled personal life adds further complications. -
The Night of the Party (2022)
This novel explores the secrets of an elite social circle after a shocking murder at a glamorous party. As Detective Riley investigates, he uncovers hidden grudges and a complex tapestry of deceit. -
The Lie in Our Marriage (2023) - now
The sixth book focuses on a couple celebrating their 25th wedding anniversary, but beneath the surface, their relationship is falling apart. A series of dark secrets and lies unravel, leading to a gripping conclusion as Detective Riley is called to solve yet another mystery. - The Housewife’s Secret (2024) - read
Grid View - Max MVC
Below is sample documentation that explains how to configure each column in your grid. You can include this in your project’s documentation (for example, as a README or developer guide).
Grid Column Data Structure
Each column in the grid is defined as an associative array. The following keys are available:
Required Keys
-
name
Type: string
Description:
The header text shown at the top of the column.
Example:'name' => 'Order ID' -
data
Type: string
Description:
Specifies how to obtain the value for each cell in this column.- If the value is a plain key (e.g.,
"order_id"), the cell displays the corresponding value from each record in your data array. - If the value contains tokens enclosed in curly braces (e.g.
"{price} * {quantity}"), it is treated as a formula. Each token is replaced by the value from the corresponding key in the data record, and the resulting expression is evaluated. Examples:
// Plain data field (must exist in each $data record) 'data' => 'order_id' // Calculated field using tokens 'data' => '{price} * {quantity}' - If the value is a plain key (e.g.,
Optional Keys
-
width
Type: string
Description:
The width of the column as a CSS value (e.g.,"60px"or"10%").
Example:'width' => '80px' -
align
Type: string
Description:
Sets the text alignment for the column. Valid values are:"left"(default)"right""center"Example:
'align' => 'right' -
formatter
Type: string
Description:
A PHP expression used to format the cell’s value. The expression is evaluated usingeval(). You can use the variable$item(or$valuefor computed columns) to reference the current cell data.
Example:'formatter' => 'number_format($item["price"], 2, ".", ",")'When using formulas for the
datakey, the computed value can be formatted by referencing$value:'formatter' => 'number_format($value, 2, ".", ",")' -
aggregate
Type: string
Description:
Specifies how to compute an aggregate value for this column (displayed in the footer). Accepted values:"sum"– calculates the total."average"– calculates the average.- A formula string (e.g.,
"({YTD_PL} / {VALUE_EUR}) * 100") that uses tokens to reference computed aggregate values from other columns. Example:
// Standard aggregate (sum) 'aggregate' => 'sum', // Aggregate based on a formula 'aggregate' => '({YTD_PL} / {VALUE_EUR}) * 100' -
aggregateToken
Type: string
Description:
Used when the computed aggregate value of this column needs to be referenced in another aggregate formula. When provided, the calculated value is stored in a global object (or passed to JavaScript) under this token name.
Example:'aggregateToken' => 'YTD_PL' -
sortable
Type: boolean (or integer with values 0/1)
Description:
Indicates whether the column is sortable by clicking on the header.
Example:'sortable' => true -
filter
Type: string
Description:
Specifies the type of filtering available for the column. Valid values are:"none"– no filter input."select"– a dropdown list of unique values."text"– a text input for filtering. Example:
'filter' => 'text' -
hide
Type: boolean
Description:
Determines whether the column is visible in the rendered grid. If set totrue, the column is hidden from the user view via CSS (display: none), but it remains in the DOM so that its data is still available for calculations (such as aggregates or formulas).
Example:'hide' => true
Example of a Complete Column Configuration
Below is a sample array of columns that demonstrates how to configure different aspects:
$columns = [
[
'name' => 'Order ID',
'data' => 'order_id',
'width' => '80px',
'align' => 'left',
'sortable' => true,
'filter' => 'text',
],
[
'name' => 'Customer',
'data' => 'customer_name',
'width' => '150px',
'align' => 'left',
'sortable' => true,
'filter' => 'select',
],
[
'name' => 'Price',
'data' => 'price',
'width' => '80px',
'align' => 'right',
'formatter' => 'number_format($item["price"], 2, ".", ",")',
'aggregate' => 'sum',
'sortable' => true,
'filter' => 'none',
],
[
'name' => 'Quantity',
'data' => 'quantity',
'width' => '60px',
'align' => 'right',
'aggregate' => 'sum',
'sortable' => true,
'filter' => 'none',
],
[
'name' => 'Total',
'data' => '{price} * {quantity}', // Calculated column using tokens
'width' => '100px',
'align' => 'right',
'formatter' => 'number_format($value, 2, ".", ",")', // $value refers to the computed total
'aggregate' => 'sum',
'sortable' => false,
'filter' => 'none',
],
[
'name' => 'Secret Code',
'data' => 'secret_code',
'hide' => true, // Hidden from the view but used for calculations or references
'sortable' => false,
'filter' => 'none',
],
];
Notes
-
Formulas in
dataoraggregate:
When using a formula, ensure that tokens (e.g.,{price}or{quantity}) exactly match the keys in your data records. If a token is missing, you may get unexpected results or errors. -
DOM and Calculations:
Even if a column is hidden (hideis set totrue), it is still rendered in the DOM (using a CSS class such ashidden-colwithdisplay: none). This is important so that JavaScript functions that perform calculations (such as aggregate totals) can still access the values. -
Formatter Security:
Sinceformatteris evaluated usingeval(), make sure that any code provided is trusted and controlled. Do not use untrusted input in these expressions.
This documentation provides an overview of how to set up and customize the grid’s column definitions. Adjust the examples to match your application’s needs, and feel free to extend the configuration with additional keys or logic as required.
VU
Cheat Sheet – Virtual Environment Manager
Standard
python3 -m venv .venv
source .venv/bin/activate // Linux
.venv\Scripts\activate // WindowsCreate and Manage Environments
| Command | Description |
|---|---|
vu new <envname> |
Create a new virtual environment |
vu rm <envname> |
Delete (remove) an environment |
vu ls |
List all virtual environments |
vu cd <envname> |
Print path to the environment |
Interactive Environment
| Command | Description |
|---|---|
vu activate <envname> |
Start a new shell with the environment active |
exit |
Exit the activated shell |
Other Helpful Commands
| Command | Description |
|---|---|
vu which <envname> |
Show path to Python binary in the env |
vu home |
Show the root directory where vu stores envs |
Typical Workflow
vu new myproject
vu run myproject pip install flask
vu run myproject python app.pyOr interactively:
vu activate myproject
# now you're inside the virtualenv
python
exitWeetjes / Quiz vragen
Wat is het verschil tussen include en require?
A) Geen verschil
B) require stopt het script bij een fout, include niet
C) include is sneller
D) require is alleen voor functies
Antwoord: B
Wat doet de isset() functie in PHP?
A) Kijkt of een variabele een lege string is
B) Kijkt of een variabele bestaat én niet null is
C) Kijkt of een array een waarde bevat
D) Zet een variabele
Antwoord: B
Wie wordt gezien als de uitvinder van het World Wide Web?
A) Bill Gates
B) Linus Torvalds
C) Tim Berners-Lee
D) Steve Jobs
Antwoord: C
(Tim Berners-Lee ontwikkelde het WWW in 1989)
Wat betekent de afkorting SSD in computerhardware?
A) Static Storage Drive
B) Super Speed Disk
C) Solid State Drive
D) Sequential Storage Device
Antwoord: C
Waarvoor wordt HTML gebruikt?
A) Styling van webpagina's
B) Structuur van een webpagina opbouwen
C) Server-side logica
D) Databases beheren
Antwoord: B
Wat betekent de afkorting CSS?
A) Computer Styled Sheets
B) Cascading Style Sheets
C) Creative Style Syntax
D) Custom Styling System
Antwoord: B
Welke tag gebruik je om een link te maken in HTML?
A) <link>
B) <a>
C) <href>
D) <url>
Antwoord: B
Welke van deze talen draait in de browser van de gebruiker?
A) PHP
B) Python
C) JavaScript
D) SQL
Antwoord: C
Wat doet de <img> tag in HTML?
A) Voegt een video toe
B) Voegt een afbeelding toe
C) Maakt een koptekst
D) Start een animatie
Antwoord: B
Welke eigenschap in CSS bepaalt de tekstkleur?
A) background-color
B) font-size
C) text-style
D) color
Antwoord: D
Wat doet console.log() in JavaScript?
A) Maakt een pop-up op het scherm
B) Stuurt gegevens naar de server
C) Toont informatie in de ontwikkelaarstools
D) Ververst de pagina
Antwoord: C
Denken in Systemen
(AI generated, LM Notebook)
Samenvatting
Donella H. Meadows' "Thinking in Systems" is een fundamentele gids voor het begrijpen van de complexe dynamiek van systemen en hoe we effectiever met ze kunnen omgaan. Het boek benadrukt dat systeemdenken essentieel is om de wereld om ons heen te begrijpen, de grondoorzaken van problemen te identificeren en duurzame veranderingen te creëren.
Hier zijn de belangrijkste concepten die in het boek worden uitgelegd:
-
Wat is een Systeem? Een systeem is een samenhangend georganiseerde verzameling van elementen die zodanig met elkaar verbonden zijn dat ze hun eigen gedragspatroon in de loop van de tijd produceren. Het bestaat uit drie essentiële onderdelen:
- Elementen: De zichtbare of onzichtbare onderdelen waaruit een systeem bestaat (bijv. spelers in een team, cellen in een lichaam, of concepten zoals trots). Het veranderen van elementen heeft meestal de minste invloed op het algehele systeemgedrag.
- Verbindingen (Interconnections): De relaties die de elementen bij elkaar houden, zoals fysieke stromen, regels, communicatie of informatiesignalen. Het veranderen van verbindingen kan een systeem drastisch veranderen.
- Functie of Doel (Function or Purpose): Het overkoepelende doel of de waarschijnlijke functie van een systeem, dat vaak kan worden afgeleid uit het gedrag ervan, zelfs als het niet expliciet is geformuleerd. Het doel is vaak de meest cruciale bepalende factor voor het systeemgedrag.
-
Voorraden (Stocks) en Stromen (Flows) Voorraden zijn de fundamenten van elk systeem, een opeenhoping van materiaal of informatie die in de loop van de tijd is opgebouwd. Ze kunnen fysiek zijn (water in een badkuip, een populatie, hout in een boom) of niet-fysiek (zelfvertrouwen, geld op een bankrekening). Een voorraad is het geheugen van de geschiedenis van veranderende stromen binnen het systeem. Stromen zijn het materiaal of de informatie die een voorraad in of uit gaan over een bepaalde periode.
- Dynamisch Evenwicht (Dynamic Equilibrium): De toestand waarin een voorraadniveau constant blijft omdat alle instromen gelijk zijn aan alle uitstromen.
- Verandering van Voorraden: Een voorraad kan worden verhoogd door de instroom te vergroten of door de uitstroom te verkleinen.
- Vertragingen (Delays) en Buffers: Voorraden veranderen langzaam en fungeren als vertragingen, buffers of schokdempers in systemen. Ze stellen instromen en uitstromen in staat om tijdelijk ontkoppeld en uit balans te zijn.
-
Terugkoppelingslussen (Feedback Loops) Een terugkoppelingslus is een gesloten keten van causale verbandenwaarbij veranderingen in een voorraad de stromen van of naar diezelfde voorraad beïnvloeden. Dit mechanisme creëert consistent systeemgedrag.
- Regulerende (Balancing) Terugkoppelingslussen (B): Deze lussen zijn doelgericht of stabiliteitszoekend. Ze proberen een voorraad op een bepaalde waarde of binnen een bereik te houden door elke opgelegde verandering tegen te werken. Voorbeelden zijn een thermostaat, die de kamertemperatuur reguleert, of het koelen van een kopje koffie naar kamertemperatuur. Ze zijn zowel bronnen van stabiliteit als van weerstand tegen verandering.
- Versterkende (Reinforcing) Terugkoppelingslussen (R): Deze lussen zijn versterkend, zelfversterkend of leiden tot een sneeuwbaleffect. Ze veroorzaken exponentiële groei of versnelde ineenstorting. Voorbeelden zijn rente op een spaarrekening, bevolkingsgroei of een wapenwedloop.
-
Waarom Systemen Ons Verrassen Systemen verrassen ons vaak omdat onze mentale modellen de complexiteit van de echte wereld niet volledig bevatten.
- Gebeurtenissen, Gedrag en Structuur: Mensen zijn vaak gefascineerd door gebeurtenissen (de meest zichtbare, maar minst voorspellende aspecten van een systeem). Het begrijpen van gedrag (patronen over tijd) is dieper, maar structuur (verweven voorraden, stromen en terugkoppelingslussen) is de sleutel tot het begrijpen van waarom iets gebeurt.
- Lineaire Geesten in een Niet-lineaire Wereld: Onze lineaire denkwijze verwacht proportionele effecten van oorzaken. De wereld is echter vol niet-lineaire relaties, waar oorzaken niet proportionele effecten produceren. Niet-lineariteiten kunnen leiden tot verschuivende dominantie van terugkoppelingslussen, waardoor een systeem van het ene gedragspatroon naar het andere overgaat.
- Niet-bestaande Grenzen: Systemen hebben zelden echte grenzen; de wereld is een continuüm. Grenzen worden in modellen geïntroduceerd voor duidelijkheid, maar te nauwe grenzen kunnen leiden tot verrassingen.
- Lagen van Limieten: Elk fysiek systeem heeft meerdere inputs en outputs, en deze zijn allemaal beperkt. De meest belangrijke input op een gegeven moment is de meest beperkende factor. Groei zelf verandert de schaarste van factoren en verschuift de beperkingen. Ononderbroken groei van fysieke entiteiten in een eindige omgeving is onmogelijk.
- Overal Aanwezige Vertragingen: Vertragingen (zoals levertijden of perceptievertragingen) zijn alomtegenwoordig in systemen. Ze zijn kritische bepalende factoren voor systeemgedrag en veelvoorkomende oorzaken van oscillaties. Te lange vertragingen kunnen leiden tot overshoot en ineenstorting.
- Begrensde Rationaliteit (Bounded Rationality): Mensen nemen beslissingen die rationeel zijn binnen de informatie die ze hebben, maar ze hebben geen perfecte informatie, vooral niet over verdere delen van het systeem. Dit kan leiden tot collectieve resultaten die niemand wenst (het "onzichtbare voet" effect). Het is cruciaal om te begrijpen waarom dit gedrag ontstaat en systemen te herontwerpen om informatiestromen en prikkels te verbeteren.
-
Eigenschappen van Zeer Functionele Systemen Functionele systemen vertonen vaak veerkracht, zelforganisatie en hiërarchie.
- Veerkracht (Resilience): Het vermogen van een systeem om terug te veren, te herstellen of zichzelf te repareren na een verstoring. Het ontstaat door meerdere terugkoppelingslussen die op verschillende manieren en tijdschalen werken. Er zijn altijd grenzen aan veerkracht, en deze wordt vaak opgeofferd ten gunste van stabiliteit of productiviteit op korte termijn.
- Zelforganisatie (Self-Organization): Het vermogen van een systeem om zijn eigen structuur complexer te maken, te leren, te diversifiëren en te evolueren. Zelforganisatie kan ontstaan uit relatief eenvoudige regels en vereist vrijheid, experimentatie en een zekere mate van wanorde.
- Hiërarchie (Hierarchy): Systemen zijn georganiseerd in subsystemen die samengevoegd zijn tot grotere subsystemen. Hiërarchieën bieden stabiliteit, veerkracht en efficiëntie. Het doel van de hogere lagen is om de doelen van de lagere lagen te dienen. Suboptimalisatie treedt op wanneer de doelen van een subsysteem ten koste gaan van de doelen van het totale systeem.
-
Systeemvallen (Archetypes) en Kansen Dit zijn veelvoorkomende systeemstructuren die problematisch gedrag produceren ("vallen"), maar met inzicht kunnen worden omgezet in "kansen".
- Beleidsweerstand / Oplossingen die Falen (Policy Resistance / Fixes that Fail): Een systeem blijft steken, ondanks pogingen om het te veranderen, door tegenstrijdige doelen van verschillende actoren. De uitweg is loslaten en doelen harmoniseren, zodat alle actoren samen aan een groter, gedeeld doel kunnen werken.
- Tragedie van de Meent (Tragedy of the Commons): Overmatig gebruik van een gedeelde, uitputbare hulpbron door zwakke feedback tussen de conditie van de hulpbron en de beslissingen van de gebruikers. Oplossingen zijn educatie, privatisering of regulering (wederzijdse dwang).
- Afkalving naar Lage Prestaties (Drift to Low Performance): Prestatie standaarden zakken geleidelijk naar beneden, vaak door een negatieve waarneming van eerdere prestaties, waardoor corrigerende actie afneemt. De uitweg is om prestatie standaarden absoluut te houden en ze te versterken op basis van de beste prestaties.
- Escalatie (Escalation): Concurrerende actoren proberen elkaar te overtreffen, wat leidt tot een zelfversterkende spiraal van groei (bijv. wapenwedloop, prijs oorlogen). De uitweg is weigering om te concurreren (eenzijdige ontwapening) of onderhandeling over nieuwe regulerende lussen.
- Succes naar de Succesvolle (Success to the Successful): Winnaars van een competitie ontvangen middelen om nog effectiever te concurreren, wat leidt tot dominantie en eliminatie van verliezers. Oplossingen zijn diversificatie, strikte beperking van winst, het gelijktrekken van het speelveld, of beloningen die de volgende ronde niet beïnvloeden.
- Verschuiven van de Last naar de Intervenient (Shifting the Burden to the Intervenor / Addiction): Een oplossing voor een probleem vermindert symptomen, maar ondermijnt het zelfherstellend vermogen van het systeem, wat leidt tot afhankelijkheid. De uitweg is om symptoomverlichtende maatregelen te vermijden en zich te richten op langetermijnherstructurering, door het systeem te helpen zichzelf te helpen.
- Regels Overtreden (Rule Beating): Het ontduiken van de intentie van regels, wat leidt tot systeemvervormingen. De uitweg is regels te herontwerpen zodat creativiteit wordt ingezet voor het doelvan de regels.
- Het Verkeerde Doel Nastreven (Seeking the Wrong Goal): Systemen volgen gehoorzaam doelen die onnauwkeurig of onvolledig zijn gedefinieerd, wat leidt tot onbedoelde resultaten (bijv. focus op BBP in plaats van welzijn). De uitweg is indicatoren en doelen te specificeren die het ware welzijn van het systeem weerspiegelen, en inspanning niet te verwarren met resultaat.
-
Hefboompunten (Leverage Points) om te Interveniëren in een Systeem Meadows presenteert een rangorde van plekken om in een systeem in te grijpen, van minst tot meest effectief. Hoe hoger op de lijst, hoe moeilijker te veranderen, maar hoe groter de potentiële impact op het systeemgedrag.
- Transcenderen van Paradigma's: Het besef dat geen enkel paradigma "waar" is, en het loslaten van absolute overtuigingen.
- Paradigmas: De diepste, vaak onuitgesproken, overtuigingen die een samenleving heeft over hoe de wereld werkt, en waaruit systeemdoelen, regels, structuren, etc. voortkomen.
- Doelen van het Systeem: Het doel of de functie van het hele systeem. Een nieuw, duidelijk geformuleerd doel kan een hele samenleving in een nieuwe richting sturen.
- Zelforganisatie: Het vermogen om systeemstructuur toe te voegen, te veranderen of te evolueren. Dit is de sterkste vorm van veerkracht.
- Regels: Incentives, straffen en beperkingen die het gedrag in een systeem definiëren.
- Informatiestromen: De structuur van wie wel en geen toegang heeft tot informatie. Het herstellen of toevoegen van ontbrekende informatiestromen is een krachtige interventie.
- Versterkende Terugkoppelingslussen (sterkte van de toename): Het vertragen van de groei in versterkende lussen is meestal krachtiger dan het versterken van regulerende lussen.
- Regulerende Terugkoppelingslussen (sterkte ten opzichte van de te corrigeren effecten): Het vermogen van regulerende lussen om de voorraad op koers te houden.
- Vertragingen (lengtes ten opzichte van de snelheid van systeemveranderingen): Vertragingen in terugkoppelingslussen zijn kritische bepalende factoren voor systeemgedrag.
- Voorraad-en-Stroom Structuren (fysieke systemen en knooppunten): De fysieke opzet van voorraden en stromen.
- Buffering (grootte van stabiliserende voorraden ten opzichte van hun stromen): Grotere buffers kunnen een systeem stabiliseren.
- Getallen (constanten en parameters): De specifieke waarden die stromen bepalen (bijv. subsidies, belastingen, standaarden). Deze zijn de minst effectieve hefboompunten.
-
Leidraden voor Leven in een Wereld van Systemen (Systeemwijsheden) Meadows concludeert met een reeks gedragswijzen die voortvloeien uit een systeemgericht wereldbeeld:
- Begrijp het Ritme van het Systeem: Observeer het gedrag van het systeem voordat je ingrijpt; leer de geschiedenis en focus op feiten in plaats van theorieën.
- Leg je Mentale Modellen Bloot: Maak aannames expliciet, daag ze uit en sta open voor correctie. Wees flexibel.
- Eer, Respecteer en Verspreid Informatie: Voorkom vervorming, vertraging of achterhouding van informatie.
- Gebruik Taal met Zorg en Verrijk Deze met Systeemconcepten: Vermijd "taalvervuiling" en breid je vocabulaire uit om complexiteit te beschrijven.
- Let op Wat Belangrijk is, Niet Alleen Wat Kwantificeerbaar is: Geef prioriteit aan kwaliteit boven kwantiteit.
- Maak Terugkoppelingsbeleid voor Terugkoppelingssystemen: Beleid moet dynamisch zijn en veranderen afhankelijk van de staat van het systeem, met ingebouwde leermechanismen.
- Streef naar het Welzijn van het Geheel: Maximaliseer geen delen of subsystemen ten koste van het geheel.
- Luister naar de Wijsheid van het Systeem: Stimuleer de krachten die het systeem zichzelf laten runnen.
- Lokaliseer Verantwoordelijkheid in het Systeem: Ontwerp systemen zo dat beslissingen direct leiden tot feedback over de gevolgen bij de beslissers.
- Blijf Bescheiden – Blijf een Leerling: Erken de onvolledigheid van mentale modellen en de complexiteit van de wereld. Leer door experimenten en omarm fouten.
- Vier Complexiteit: Erken en omarm de rommelige, niet-lineaire, dynamische en zelforganiserende aard van het universum.
- Verruim Tijdshorizonten: Kijk verder dan de korte termijn, rekening houdend met de gevolgen op lange termijn.
- Trotseer de Disciplines: Volg een systeem waar het ook naartoe leidt, over traditionele disciplinaire grenzen heen.
- Verruim de Grens van Zorgzaamheid (Caring): Erken de diepe verbondenheid van alle mensen en het mondiale ecosysteem.
- Erodeer het Doel van Goedheid Niet: Behoud hoge morele standaarden en geef geen gehoor aan cynisme.
Donella Meadows' werk moedigt ons aan om de wereld te zien als een complex web van onderling verbonden elementen, in plaats van geïsoleerde problemen, wat ons in staat stelt om diepere inzichten te verwerven en effectievere interventies te plegen.
FAQ in 8 vragen
Wat is een systeem en hoe kan ik het herkennen?
Een systeem is een verzameling van onderling verbonden elementen die samen een functie vervullen en gedrag vertonen dat niet te herleiden is tot de afzonderlijke delen. Om te bepalen of iets een systeem is, kun je jezelf drie vragen stellen: 1) Kun je de onderdelen identificeren? 2) Beïnvloeden de onderdelen elkaar? en 3) Produceren de onderdelen samen een effect dat anders is dan het effect van elk onderdeel afzonderlijk? Concrete voorbeelden van systemen zijn een school, een stad, een fabriek, een dier of een boom. Zelfs immateriële zaken zoals schooltrots of academische bekwaamheid kunnen elementen van een systeem zijn. Daarentegen is zand dat toevallig op een weg gestrooid is geen systeem, omdat het ontbreekt aan specifieke onderlinge verbindingen of functies.
Wat zijn "stocks" en "flows" in een systeem, en waarom zijn ze belangrijk?
"Stocks" (voorraden) zijn de fundamenten van elk systeem; ze representeren de hoeveelheid materiaal of informatie die op een bepaald moment in het systeem aanwezig is, zoals water in een badkuip, een populatie, boeken in een boekhandel, of zelfs je zelfvertrouwen. Stocks zijn de "geheugens" van het systeem, de cumulatieve resultaten van de geschiedenis van veranderende flows. "Flows" (stromen) zijn de bewegingen van materiaal of informatie die stocks vullen of legen. Dit kunnen bijvoorbeeld vulling en legen zijn, geboorten en sterfgevallen, aankopen en verkopen. Het begrijpen van de dynamiek van stocks en flows, oftewel hoe ze over tijd veranderen, is essentieel voor het begrijpen van complex systeemgedrag. Stocks veranderen over het algemeen langzaam en fungeren als vertragingen, buffers of schokdempers in een systeem, waardoor inflows en outflows tijdelijk losgekoppeld en onafhankelijk van elkaar kunnen zijn.
Wat is een feedbackloop en welke twee hoofdtypen feedbackloops zijn er?
Een feedbackloop is het mechanisme dat een verandering in een stock beïnvloedt door een flow in of uit diezelfde stock. Het is een gesloten keten van causale verbanden die begint bij een stock, door beslissingen of regels die afhankelijk zijn van het niveau van die stock, en dan weer teruggaat via een flow om de stock te veranderen. Er zijn twee hoofdtypen feedbackloops:
- Balancerende feedbackloops (B): Deze loops zijn doelgericht of stabiliteitsgericht. Ze proberen een stock op een bepaalde waarde of binnen een bepaald bereik te houden. Een balancerende loop is gericht tegen elke verandering die aan het systeem wordt opgelegd, en probeert de stock terug te brengen naar zijn gewenste staat (bijvoorbeeld een thermostaat die de kamertemperatuur reguleert).
- Versterkende feedbackloops (R): Deze loops veroorzaken groei of daling van een stock door een constante fractie van zichzelf. Ze zorgen ervoor dat een verandering in dezelfde richting blijft voortgaan (bijvoorbeeld rente op een bankrekening: hoe meer geld, hoe meer rente, wat leidt tot nog meer geld).
Hoe beïnvloeden vertragingen (delays) het gedrag van systemen?
Vertragingen zijn alomtegenwoordig in systemen en zijn sterke bepalende factoren van systeemgedrag. Elke stock is op zichzelf al een vertraging, en de meeste flows kennen vertragingen, zoals verzendvertragingen, perceptievertragingen of verwerkingsvertragingen. Stocks reageren pas geleidelijk op veranderingen, zelfs op plotselinge veranderingen, door langzaam te vullen of te legen. Het aanpassen van de lengte van een vertraging kan een grote verandering teweegbrengen in het gedrag van een systeem. Het is cruciaal om te begrijpen waar en hoe lang vertragingen optreden in informatiestromen of fysieke processen, omdat dit krachtige beleidshefbomen kunnen zijn om het systeem gemakkelijker of moeilijker te beheren.
Wat is "bounded rationality" en de implicaties ervan voor systeemgedrag?
"Bounded rationality" (begrensde rationaliteit) verwijst naar de logica die leidt tot beslissingen of acties die zinvol zijn binnen één deel van een systeem, maar niet redelijk zijn binnen een bredere context of wanneer ze worden gezien als onderdeel van het grotere systeem. Mensen zijn geen alwetende, rationele optimaliseerders, maar eerder "satisficers" die proberen hun behoeften voldoende te bevredigen voordat ze verdergaan met de volgende beslissing. We handelen rationeel binnen onze beperkte kennis en informatie, negeren vaak de gevolgen van onze acties voor het hele systeem, en zien zelden het volledige scala aan mogelijkheden. Dit betekent dat het plaatsen van nieuwe actoren in hetzelfde systeem de prestaties van het systeem niet zal verbeteren als de onderliggende informatie, prikkels, doelen, stressfactoren en beperkingen die de begrensde rationaliteit van de actoren bepalen, niet worden aangepakt door het systeem te herontwerpen.
Waarom zijn systeemgrenzen en "clouds" belangrijk in systeemmodellering?
In systeemmodellering is het noodzakelijk om grenzen te stellen om een systeem te kunnen analyseren en begrijpen, aangezien "er geen aparte systemen zijn; de wereld is een continuüm." Waar je een grens trekt, hangt af van het doel van de analyse en de vragen die je wilt beantwoorden. "Clouds" (wolken) in systeemdiagrammen vertegenwoordigen bronnen of bestemmingen voor flows die voor het huidige doel van de discussie als buiten het systeem worden beschouwd. Het is belangrijk om je bewust te zijn van de aannames die je maakt wanneer je een cloud gebruikt. Als bijvoorbeeld grondstoffen gegarandeerd overvloedig zijn, volstaat een cloud. Maar als er een tekort aan materialen zou kunnen ontstaan, en deze stock niet in het mentale systeemmodel wordt opgenomen, kan dit leiden tot verrassingen in de toekomst. Een te nauwe afbakening kan leiden tot het over het hoofd zien van belangrijke invloeden, zoals de impact van economische ontwikkeling buiten de officiële perimeter van een nationaal park op de ecologie binnen het park.
Wat is de "tragedy of the commons" en hoe kan deze worden opgelost?
De "tragedy of the commons" (tragedie van de meent) ontstaat wanneer individuen, handelend in hun eigen belang, een gemeenschappelijke hulpbron uitputten, omdat de voordelen van hun acties voor henzelf zijn, terwijl de kosten (uitputting van de hulpbron) worden gedeeld door iedereen. Dit leidt tot een onvermijdelijke ondergang als de gemeenschap onbeperkt groeit in een wereld die beperkt is. De oplossing hiervoor is niet eenvoudig, maar omvat vaak "mutual coercion, mutually agreed upon" (wederzijdse dwang, wederzijds overeengekomen). Dit kan verschillende vormen aannemen, zoals:
- Privatisering: Het verdelen van de commons in individuele eigendommen.
- Regulering: Het instellen van regels en handhaving (bijv. verkeerslichten, parkeermeters, vergunningen voor radiofrequenties).
- Feedbackmechanismen herstellen: Het direct laten voelen van de economische impact van iemands gebruik van de commons (bijv. betalen voor afval op basis van volume). Deze oplossingen transformeren het systeem om de ontbrekende feedbackmechanismen te herstellen en zo overexploitatie te voorkomen.
Waarom is het belangrijk om naar het doel van een systeem te kijken en het meten van het succes?
Het doel of de intentie van een systeem is een van de krachtigste hefbomen om het gedrag ervan te beïnvloeden. Het doel is de richtinggever van het systeem, de definieerder van discrepanties die actie vereisen, en de indicator van naleving, falen of succes waar balancerende feedbackloops naar toe werken. Als het doel slecht is gedefinieerd, als het niet meet wat het hoort te meten, of als het niet het werkelijke welzijn van het systeem weerspiegelt, kan het systeem onmogelijk een wenselijk resultaat produceren. Systemen hebben de neiging om precies datgene te produceren waarnaar gevraagd wordt. Een veelvoorkomende fout is het verwarren van inspanning met resultaat, bijvoorbeeld het meten van het succes van gezinsplanning in termen van geïmplanteerde spiraaltjes in plaats van geboortecijfers. Een van de ergste voorbeelden hiervan is het gebruik van het Bruto Nationaal Product (BNP) als maatstaf voor nationaal economisch succes, terwijl het de menselijke welvaart vaak onvoldoende weergeeft. Het is cruciaal om doelen te stellen op basis van wat werkelijk belangrijk is, in plaats van wat gemakkelijk meetbaar is, en om de kwaliteit boven de kwantiteit te stellen.
Study Guide
Denkend in Systemen: Een Gedetailleerde Studiegids
Deze studiegids is ontworpen om uw begrip van het bronmateriaal uit "Thinking in Systems" van Donella H. Meadows te toetsen en te verdiepen.
Quiz: Korte Antwoordvragen
Beantwoord elke vraag in 2-3 zinnen.
- Wat is het fundamentele verschil tussen een Slinky en een lege doos in de context van systeemdenken? De Slinky's veerkracht en beweging komen voort uit zijn interne structuur en onderlinge verbindingen. De lege doos heeft deze inherente eigenschappen niet; de beweging wordt volledig bepaald door externe manipulatie.
- Waarom benadrukt Meadows het gebruik van diagrammen en tijdsgrafieken bij het bespreken van systemen? Systemen werken gelijktijdig in meerdere richtingen en zijn onderling verbonden. Woorden zijn lineair, terwijl visuele representaties zoals diagrammen de simultane aard van systeeminteracties beter kunnen weergeven.
- Hoe bepalen we of een verzameling elementen een "systeem" vormt? Een verzameling elementen is een systeem als de delen elkaar beïnvloeden, en samen een effect produceren dat verschilt van het effect van elk afzonderlijk deel. Er moeten identificeerbare onderdelen zijn met specifieke onderlinge verbindingen en functies.
- Wat is het verschil tussen een 'stock' en een 'flow' in een systeem, en hoe zijn ze gerelateerd? Een stock is een hoeveelheid of accumulatie die op een bepaald moment kan worden gemeten (bijv. water in een badkuip). Een flow is de beweging van materiaal of informatie die een stock in de loop van de tijd vult of leegt (bijv. instroom en uitstroom van water).
- Leg uit waarom stocks worden beschouwd als "vertragingen" of "buffers" in systemen. Stocks nemen tijd om te veranderen, zelfs als de flows plotseling veranderen, omdat flows ook tijd nodig hebben om te stromen. Dit betekent dat stocks veranderingen opvangen en vertragen, waardoor ze fungeren als stabilisatoren in het systeem.
- Wat is een 'balancing feedback loop' en geef een kort voorbeeld? Een balancing feedback loop is een stabiliserende, doelzoekende lus die een stock op een bepaalde waarde of binnen een bereik probeert te houden. Een voorbeeld is een thermostaat die de kamertemperatuur reguleert door de verwarming aan of uit te zetten.
- Wat is een 'reinforcing feedback loop' en geef een kort voorbeeld? Een reinforcing feedback loop is een lus die een verandering in het systeem versterkt en leidt tot exponentiële groei of verval. Een voorbeeld is een spaarrekening: hoe meer geld u heeft, hoe meer rente u verdient, wat weer bijdraagt aan meer geld en dus meer rente.
- Waarom is het concept van 'bounded rationality' cruciaal voor systeemdenkers? Bounded rationality verwijst naar het feit dat individuen beslissingen nemen op basis van beperkte informatie en een beperkte focus op hun eigen nabije belangen. Dit betekent dat beslissingen die rationeel zijn voor een onderdeel van het systeem, niet noodzakelijkerwijs het welzijn van het gehele systeem bevorderen.
- Hoe kunnen "vertragingen" ("delays") de dynamiek van een systeem beïnvloeden en waarom zijn ze belangrijk om te begrijpen? Vertragingen zijn overal aanwezig in systemen en kunnen de gedragsdynamiek sterk bepalen, soms leidend tot oscillaties of onverwachte resultaten. Het begrijpen van de aard en lengte van vertragingen is essentieel om systeemgedrag te kunnen analyseren en potentieel te beïnvloeden.
- Wat is de 'tragedy of the commons' en hoe kan dit systeemprobleem worden aangepakt? De tragedy of the commons treedt op wanneer individuen, handelend in hun eigenbelang, een gedeelde, beperkte hulpbron uitputten. Het kan worden aangepakt door "wederzijdse dwang, wederzijds overeengekomen", zoals het instellen van regels, quota, prijzen, of fysieke barrières voor het gebruik van de gemeenschappelijke bron.
Antwoordsleutel Quiz
- Wat is het fundamentele verschil tussen een Slinky en een lege doos in de context van systeemdenken? Het verschil ligt in hun interne structuur. De Slinky's veerbeweging komt voort uit zijn eigen inherente eigenschappen en onderlinge verbindingen, terwijl de doos alleen beweegt als deze extern wordt gemanipuleerd en geen interne dynamiek heeft.
- Waarom benadrukt Meadows het gebruik van diagrammen en tijdsgrafieken bij het bespreken van systemen? Systemen zijn multidirectioneel en gelijktijdig met elkaar verbonden, wat moeilijk is om lineair met woorden te beschrijven. Diagrammen en grafieken bieden een taal die de simultane en onderling verbonden aard van systeemverschijnselen beter kan vastleggen.
- Hoe bepalen we of een verzameling elementen een "systeem" vormt? Een verzameling is een systeem als de onderdelen elkaar beïnvloeden en samen een effect produceren dat verschilt van het effect van elk afzonderlijk deel. Dit impliceert dat er specifieke onderlinge verbindingen en een functie aanwezig zijn, in tegenstelling tot een willekeurige opeenhoping.
- Wat is het verschil tussen een 'stock' en een 'flow' in een systeem, en hoe zijn ze gerelateerd? Een 'stock' is een meetbare hoeveelheid of accumulatie op een bepaald moment, zoals water in een badkuip. Een 'flow' is de stroom van materiaal of informatie die de stock in de loop van de tijd verandert, zoals de instroom of uitstroom van water. Flows vullen of legen stocks.
- Leg uit waarom stocks worden beschouwd als "vertragingen" of "buffers" in systemen. Stocks veranderen langzaam omdat flows tijd nodig hebben om te stromen, zelfs als de flows abrupt veranderen. Dit betekent dat stocks veranderingen opvangen en vertragen, waardoor ze een stabiliserend effect hebben en fungeren als schokdempers in het systeem.
- Wat is een 'balancing feedback loop' en geef een kort voorbeeld? Een balancing feedback loop is een stabiliserende, doelzoekende lus die een stock op een gewenste waarde of binnen een bereik houdt door veranderingen tegen te werken. Een koelende kop koffie die de kamertemperatuur benadert, is een voorbeeld van zo'n lus die streeft naar evenwicht.
- Wat is een 'reinforcing feedback loop' en geef een kort voorbeeld? Een reinforcing feedback loop is een lus die een initiële verandering versterkt, wat leidt tot exponentiële groei of afname. Het voorbeeld van een rentedragende bankrekening toont dit: hoe meer geld op de rekening, hoe meer rente wordt verdiend, wat de groei verder stimuleert.
- Waarom is het concept van 'bounded rationality' cruciaal voor systeemdenkers? Bounded rationality benadrukt dat mensen handelen op basis van beperkte informatie en hun directe belangen, vaak zonder de gevolgen voor het hele systeem te overzien. Dit is cruciaal omdat het verklaart waarom individueel 'rationele' beslissingen collectief tot ongewenste systeemprestaties kunnen leiden.
- Hoe kunnen "vertragingen" ("delays") de dynamiek van een systeem beïnvloeden en waarom zijn ze belangrijk om te begrijpen? Vertragingen zijn alomtegenwoordig en bepalen sterk het systeemgedrag, vaak leidend tot oscillaties of onverwachte resultaten. Het nauwkeurig identificeren van de locatie en lengte van vertragingen is essentieel, omdat het aanpassen ervan krachtige beleidsinstrumenten kan zijn om systeemgedrag te sturen.
- Wat is de 'tragedy of the commons' en hoe kan dit systeemprobleem worden aangepakt? De tragedy of the commons beschrijft de uitputting van een gedeelde hulpbron wanneer individuen hun eigenbelang nastreven. Dit probleem kan worden aangepakt door mechanismen van "wederzijdse dwang, wederzijds overeengekomen", zoals regulering, quota, heffingen of privatisering om het gebruik te beperken.
Essayvragen
- Bespreek de rol van "stocks" en "flows" als fundamentele bouwstenen van systemen. Hoe beïnvloeden hun dynamiek het gedrag van complexe systemen, en geef concrete voorbeelden uit het bronmateriaal om uw argumenten te ondersteunen.
- Analyseer de begrippen 'balancing feedback loops' en 'reinforcing feedback loops'. Hoe interacteren deze twee soorten loops om complex systeemgedrag te creëren? Illustreer uw antwoord met voorbeelden van zowel natuurlijke als mensgemaakte systemen.
- "De grenzen van een systeem hangen af van het doel van de discussie – de vragen die we willen stellen." Bespreek deze bewering van Meadows. Waarom is het trekken van grenzen noodzakelijk, maar ook potentieel misleidend, in systeemmodellering? Gebruik voorbeelden zoals 'clouds' en de evolutie van parkmanagement om uw punt te verduidelijken.
- Meadows stelt dat "er altijd grenzen aan groei zullen zijn." Leg uit wat zij hiermee bedoelt, zowel vanuit een zelfopgelegd als een systeem-opgelegd perspectief. Hoe relateert dit concept zich aan de 'tragedy of the commons' en welke lessen kunnen we hieruit trekken voor duurzaam beheer van hulpbronnen?
- Het concept van 'bounded rationality' verklaart waarom goedbedoelde individuele acties vaak tot ongewenste systeemuitkomsten leiden. Bespreek hoe de structuur van een systeem, inclusief informatie, prikkels en doelen, de beslissingen van actoren vormt. Hoe kan het herontwerpen van deze structuren leiden tot betere systeemprestaties?
Woordenlijst van Sleuteltermen
- Balancing feedback loop: Een stabiliserende, doelzoekende, regulerende feedbacklus, ook wel een "negatieve feedbacklus" genoemd, omdat deze de richting van de verandering die op het systeem wordt uitgeoefend, tegengaat of omkeert.
- Bounded rationality: De logica die leidt tot beslissingen of acties die zinvol zijn binnen één deel van een systeem, maar niet redelijk zijn in een bredere context of wanneer ze worden gezien als onderdeel van het bredere systeem.
- Buffers: De omvang van stabiliserende stocks in verhouding tot hun flows; grote stocks die veranderingen opvangen en vertragen, waardoor ze het systeem stabiliseren.
- Delays (Vertragingen): Tijdslagen in flows, waarneming, verwerking of reactie die het dynamische gedrag van een systeem sterk beïnvloeden en kunnen leiden tot oscillaties of onverwachte uitkomsten.
- Dynamic equilibrium: De toestand waarin de stock (het niveau of de omvang) stabiel en onveranderd blijft, ondanks instromen en uitstromen. Dit is alleen mogelijk wanneer alle instromen gelijk zijn aan alle uitstromen.
- Dynamics: Het gedrag over tijd van een systeem of een van zijn componenten.
- Elements (Elementen): De zichtbare, tastbare onderdelen van een systeem, maar ook immateriële zaken zoals trots of vaardigheid. Het zijn de "dingen" waaruit een systeem is opgebouwd.
- Feedback loop: Het mechanisme (regel of informatiestroom of signaal) dat een verandering in een stock toelaat om een flow in of uit diezelfde stock te beïnvloeden. Een gesloten keten van causale verbanden van een stock, via een reeks beslissingen en acties afhankelijk van het niveau van de stock, en weer terug via een flow om de stock te veranderen.
- Flow: Materiaal of informatie dat een stock binnengaat of verlaat gedurende een bepaalde periode. Flows vullen of legen stocks.
- Hierarchy: Systemen georganiseerd op een manier die een groter systeem creëert. Subsystemen binnen systemen, die weer zijn ingebed in andere systemen.
- Leverage points: Plaatsen in een systeem waar een kleine verandering een grote, langdurige impact kan hebben op het gedrag van het systeem als geheel. (Hoewel niet direct gedefinieerd, is dit een centraal concept in de tekst en de bredere context van Meadows' werk).
- Limits to growth: Het concept dat er altijd grenzen zullen zijn aan fysieke groei, of deze nu zelfopgelegd zijn of door het systeem worden afgedwongen. Geen enkele fysieke entiteit kan voor altijd groeien.
- Paradigms: De diepste sets van overtuigingen of aannames over hoe de wereld werkt; de gedeelde sociale overeenkomsten over de aard van de werkelijkheid. Paradigma's zijn de bronnen van systemen, waaruit system doelen, informatiestromen en feedbackloops voortkomen.
- Policy resistance: Een systeemvalkuil waarbij de doelen van subsystemen verschillend en inconsistent zijn met elkaar, wat leidt tot een patstelling en weerstand tegen verandering in het hele systeem.
- Reinforcing feedback loop: Een feedbacklus die een verandering in het systeem versterkt en leidt tot exponentiële groei of verval. Ook bekend als een "positieve feedbacklus" omdat deze de richting van de verandering handhaaft of versnelt.
- Rule beating: Een systeemvalkuil waarbij evasieve acties worden ondernomen om de intentie van de regels van een systeem te omzeilen, door de letter, maar niet de geest, van de wet te volgen, wat kan leiden tot perverse gedragingen en systeemvervormingen.
- Self-organization: Het vermogen van een systeem om zijn eigen structuur, gedrag en doelen te creëren, zonder externe controle of sturing. Dit omvat de evolutie van nieuwe structuren en toenemende complexiteit, zoals hiërarchie.
- Shifting the burden: Een systeemvalkuil waarbij een symptoom van een probleem wordt aangepakt, maar de onderliggende oorzaak onbehandeld blijft, wat vaak leidt tot afhankelijkheid van de symptomatische oplossing en een verzwakking van het systeem op lange termijn.
- Stock: De fundering van elk systeem; een hoeveelheid, een accumulatie of een opslag van materiaal of informatie die zich in de loop van de tijd heeft opgebouwd. Het kan worden gezien, gevoeld, geteld of gemeten op een bepaald moment.
- System: Een verzameling elementen, onderlinge verbindingen en een functie of doel, die samen een geheel vormen met een specifiek gedrag dat niet alleen kan worden begrepen door de afzonderlijke delen te kennen.
- Tragedy of the commons: Een systeemvalkuil waarbij individuen, handelend in hun eigen belang, een gedeelde, beperkte hulpbron uitputten, omdat de voordelen van extra gebruik bij het individu liggen, terwijl de kosten worden gedeeld door iedereen.
--
Verkiezingen 2025
Israël–Palestina
Pro-Israël → Pro-Palestina
PVV → VVD → JA21 → NSC → CDA → D66 → SP → PvdD → GroenLinks–PvdA → DENK
Standpunten Israël–Palestina
| Partij | Kernpunten |
|---|---|
| PVV | Uiterst pro-Israël; éénstaatoplossing, ambassade Jeruzalem. |
| VVD | Pro-Israël; diplomatie, geen sancties, intern verdeeld. |
| JA21 | Sterk pro-Israël; Hamas/Iran dreiging benadrukt. |
| NSC | Licht pro-Israël; tweestatenoplossing, geen sancties. |
| CDA | Zelfverdediging Israël, maar humanitair recht; tweestatenoplossing. |
| D66 | Tweestatenoplossing (1967-grenzen); erkenning Palestijnse staat. |
| SP | Kritisch; noemt oorlog mogelijk genocide; erkenning Palestina. |
| PvdD | Pro-Palestina; sancties tegen Israël, gelijkwaardigheid. |
| GroenLinks–PvdA | Wapenembargo, sancties, stop nederzettingen. |
| DENK | Uiterst pro-Palestina; sancties, boycot, directe erkenning. |
Immigratie
Restrictief → Ruimhartig
PVV → JA21 → VVD → NSC → CDA → D66 → SP → GroenLinks–PvdA → PvdD → DENK
Standpunten Immigratie
| Partij | Kernpunten |
|---|---|
| PVV | Immigratie islamitische landen stoppen, asiel afschaffen. |
| JA21 | Asiel beperken, opvang in regio, minder arbeidsmigratie. |
| VVD | Instroom beperken, opvang in regio, kennismigratie welkom. |
| NSC | Strengere regels, integratie, opvang in regio. |
| CDA | Opvang in regio, streng terugkeerbeleid, ruimte voor MKB. |
| D66 | Menswaardig asielbeleid in EU, kennismigratie open. |
| SP | Humaan asielbeleid, kritisch op arbeidsmigratie door bedrijven. |
| GroenLinks–PvdA | Solidaire opvang, bescherming tegen uitbuiting. |
| PvdD | Humaan asielbeleid, bescherming vluchtelingenrechten. |
| DENK | Sterk pro-migratie; gelijke kansen en rechten. |
Bedrijven & Vestigingsklimaat
Pro-bedrijven → Kritisch op bedrijven
VVD → JA21 → NSC → CDA → PVV → D66 → GroenLinks–PvdA → SP → PvdD → DENK
Standpunten Bedrijven
| Partij | Kernpunten |
|---|---|
| VVD | Zeer pro-bedrijven, lage lasten, aantrekkelijk klimaat. |
| JA21 | Lagere lasten, minder regeldruk, tegen beurstaksen. |
| NSC | Vestigingsklimaat belangrijk, maar streng op constructies. |
| CDA | Pro-MKB, industrie behouden, maar duurzaamheidsregels. |
| PVV | Lagere lasten, vooral voor nationale bedrijven. |
| D66 | Balans: steun innovatie, hogere lasten op vervuiling. |
| GroenLinks–PvdA | Hogere winsten/kapitaal belasten, beurstaks. |
| SP | Forse belastingen op winsten en aandeleninkoop. |
| PvdD | Zware lasten op vervuiling, strengere regels. |
| DENK | Sociale rechtvaardigheid boven bedrijfsbelangen. |
Belastingdruk Particulieren
Laag → Hoog
PVV → VVD → JA21 → NSC → CDA → D66 → DENK → GroenLinks–PvdA → PvdD → SP
Standpunten Belastingdruk Particulieren
| Partij | Kernpunten |
|---|---|
| PVV | Lasten verlagen (energie, btw, zorg), lagere belastingdruk. |
| VVD | Lage lasten werkenden, beperken inkomstenbelasting. |
| JA21 | Lagere inkomsten- en erfbelasting, tegen vermogenslasten. |
| NSC | Middeninkomens ontzien, milde stijging hogere inkomens. |
| CDA | Gezinnen en middeninkomens ontzien, eerlijke verdeling. |
| D66 | Arbeid omlaag, vermogen en vervuiling omhoog. |
| DENK | Lage inkomens ontzien, hoge inkomens en kapitaal zwaarder. |
| GroenLinks–PvdA | Progressief stelsel, hogere lasten top, lagere lasten midden. |
| PvdD | Arbeid ontzien, hogere belasting op vervuiling en vermogen. |
| SP | S terke herverdeling, veel hogere lasten rijkdom/vermogen. |
Inkomen & Werk
Marktgericht / lage herverdeling → Sterke herverdeling / inkomensgelijkheid
VVD → JA21 → PVV → NSC → CDA → D66 → DENK → GroenLinks–PvdA → PvdD → SP
Standpunten Inkomen & Werk
| Partij | Kernpunten |
|---|---|
| VVD | Lage lasten op werk; stimuleren ondernemerschap en hoge inkomens; beperkt herverdelingsbeleid. |
| JA21 | Lagere lasten op arbeid; meer ruimte voor ondernemers en middeninkomens; tegen extra progressieve belastingen. |
| PVV | Lastenverlichting voor midden- en lage inkomens; meer koopkracht; minder nadruk op herverdeling via belastingen. |
| NSC | Focus op middeninkomens; eerlijk loon; beperkt hogere lasten voor topinkomens; balans tussen markt en bescherming. |
| CDA | Waarde voor werk en gezin; inkomensverschillen accepteren, maar steun voor kwetsbare groepen; gematigde herverdeling. |
| D66 | Lasten verschuiven van arbeid naar vermogen en vervuiling; minimumloon verhogen; stimuleren werk via scholing. |
| DENK | Gelijke kansen op de arbeidsmarkt; hogere lasten voor hoge inkomens; bestrijden van discriminatie op werkvloer. |
| GroenLinks–PvdA | Sterke inkomensherverdeling; hogere belastingen voor topinkomens; verhoging minimumloon en betere sociale zekerheid. |
| PvdD | Meer gelijkheid; hogere lasten voor vervuilende en rijke groepen; basiszekerheid centraal boven marktwerking. |
| SP | Zeer sterk voor herverdeling; forse verhoging minimumloon; hogere belastingen voor grootverdieners; inkomensverschillen terugdringen. |
Vermogensbelasting
Laag → Hoog
VVD → PVV → JA21 → NSC → CDA → D66 → DENK → GroenLinks–PvdA → PvdD → SP
Standpunten Vermogensbelasting
| Partij | Kernpunten |
|---|---|
| VVD | Tegen hogere vermogensbelasting; geen beurstaks. |
| PVV | Lastenverlichting sparen/huizen; tegen hogere vermogensbelasting. |
| JA21 | Tegen vermogens- en beurstaks; lagere erfbelasting. |
| NSC | Aanpak constructies, spaarders ontzien. |
| CDA | Kleine vermogens ontzien, milde verhoging top. |
| D66 | Meer progressiviteit; hogere vermogensbelasting. |
| DENK | Hogere belasting op hoge vermogens; eerlijke verdeling. |
| GroenLinks–PvdA | Progressieve vermogensbelasting, beurstaks. |
| PvdD | Extra belasting vermogen, koppeling aan ecologie. |
| SP | Forse vermogensbelasting; aanpak grootkapitaal. |
Europa (EU-integratie)
Minder EU / nationaler → Meer EU / federaler
PVV → JA21 → SP → NSC → VVD → CDA → PvdD → DENK → GroenLinks–PvdA → D66
Standpunten Europa (EU-integratie)
| Partij | Kernpunten |
|---|---|
| PVV | S terk EU-kritisch; soevereiniteit boven EU; tegen verdere integratie (tot en met uittredingsretoriek). |
| JA21 | Minder macht voor Brussel; geen overdracht van bevoegdheden; strenger op migratie en grenzen in EU-kader. |
| SP | Links EU-kritisch; tegen neoliberale regels; samenwerking ja, geen federale EU of begrotingsunie. |
| NSC | Nuchter en terughoudend; subsidiariteit; kritischer op nieuwe overdracht van bevoegdheden. |
| VVD | Pro-EU voor handel/veiligheid; geen federale sprongen; strenger op begrotings- en migratieregels. |
| CDA | Constructief pro-EU; hervormen i.p.v. federaliseren; samenwerking op veiligheid, landbouw en economie. |
| PvdD | EU voor klimaat/dierenwelzijn; kritisch op landbouw- en handelsbeleid; geen federale focus. |
| DENK | Overwegend pro-EU; inzet op grondrechten en bescherming arbeidsmigratie binnen EU-kader. |
| GroenLinks–PvdA | Duidelijk pro-EU; versterking voor klimaat, sociaal beleid en rechtsstaat. |
| D66 | Zeer pro-EU/federaler; verdieping integratie (defensie, rechtsstaat, klimaat, innovatie). |
Landbouw en Stikstof
Boeren beschermen / minder regels → Strenge stikstof / krimp veestapel
PVV → JA21 → CDA → VVD → NSC → DENK → SP → D66 → GroenLinks–PvdA → PvdD
Standpunten Landbouw en Stikstof
| Partij | Kernpunten |
|---|---|
| PVV | Boeren maximaal ontzien; stikstofnormen versoepelen; geen gedwongen krimp/onteigening. |
| JA21 | Regeldruk omlaag; techniek en innovaties i.p.v. krimp; kritischer op Natura2000/meetmethodes. |
| CDA | Boerenperspectief centraal; gebiedsgericht maatwerk; liefst vrijwillige uitkoop. |
| VVD | Mix van innovatie, verduurzaming en vrijwillige uitkoop; doelen naleven met zo min mogelijk dwang. |
| NSC | Realistische doelen; gebiedsgericht; eerst meten en plannen verbeteren; dwang als laatste redmiddel. |
| DENK | Duurzaam en sociaal: milieudoelen met compensatie; eerlijk inkomen voor boeren. |
| SP | Ecologische doelen halen, kleine/gezinsbedrijven beschermen; aanpak megastallen en ketenmacht. |
| D66 | Sneller natuurherstel; duidelijke reductie; vrijwillige uitkoop grootschalig, krimp waar nodig. |
| GroenLinks–PvdA | Strenge stikstofaanpak; veestapel verkleinen; natuur/waterkwaliteit prioriteit; eerlijke transitie. |
| PvdD | Vergaande krimp veestapel; uitfaseren intensieve veehouderij; natuur- en dierenwelzijn voorop. |
Klimaat & Energie
Fossiele energie behouden → Snelle verduurzaming / fossiel uitfaseren
PVV → JA21 → CDA → VVD → NSC → SP → DENK → GroenLinks–PvdA → D66 → PvdD
Standpunten Klimaat & Energie
| Partij | Kernpunten |
|---|---|
| PVV | Klimaatbeleid “hysterie”; fossiele brandstoffen behouden; tegen klimaatplannen en windmolens. |
| JA21 | Pragmatisch: energiezekerheid via gas en kernenergie; tegen snelle uitfasering fossiel; kritischer op subsidies. |
| CDA | Stapsgewijs verduurzamen; mix van kernenergie, hernieuwbaar en innovatie; sectoren meenemen. |
| VVD | Klimaatbeleid met oog voor economie; kernenergie, waterstof, innovatie; fossiel afbouwen bij zekerheid. |
| NSC | Realistisch: reductie nodig, maar tempo/kosten beheersen; kernenergie belangrijk. |
| SP | Eerlijke transitie; energierekening omlaag; investeren in publieke energiebedrijven en isolatie. |
| DENK | Verduurzaming met sociale rechtvaardigheid; beleid betaalbaar houden voor gezinnen. |
| GroenLinks–PvdA | Ambitieus; hernieuwbaar, isolatie en ov; fossiel snel uitfaseren. |
| D66 | Hogere klimaatdoelen; zon, wind en kernenergie; NL koploper. |
| PvdD | Vergaand; fossiel snel afbouwen; tegen kernenergie; focus op natuur, hernieuwbaar, consumptie omlaag. |
Sociaal-cultureel beleid (identiteit & diversiteit)
Nationale identiteit → Multicultureel / diversiteit centraal
PVV → JA21 → NSC → VVD → CDA → SP → PvdD → GroenLinks–PvdA → D66 → DENK
Standpunten Sociaal-cultureel beleid (identiteit & diversiteit)
| Partij | Kernpunten |
|---|---|
| PVV | Nadruk op Nederlandse identiteit; tegen islamisering en diversiteitsbeleid; “eigen cultuur eerst”. |
| JA21 | Beperken immigratie en culturele invloed; kritischer op diversiteitsbeleid; nationale waarden. |
| NSC | Waarden en normen behouden; gematigd kritisch op identiteitspolitiek; wel ruimte voor integratie. |
| VVD | Integratieplicht; burgerschap en taal; diversiteit mag, geen aparte behandeling. |
| CDA | Gemeenschapswaarden; verbondenheid; integratie via samenleving en onderwijs. |
| SP | Gelijkheid voor iedereen; kritisch op symboolpolitiek; nadruk op solidariteit en gelijke kansen. |
| PvdD | Gelijke rechten; steun voor inclusiebeleid; ethiek en rechtvaardigheid. |
| GroenLinks–PvdA | S terk pro-diversiteit; actief tegen discriminatie; diversiteit als verrijking. |
| D66 | Vrijheid en diversiteit; pro-LHBTQ+; inclusie en multiculturaliteit. |
| DENK | Uiterst pro-diversiteit; bestrijding racisme en discriminatie; diversiteit als kracht. |
Defensie & NAVO
Minder defensie-uitgaven → Meer investeren in NAVO/leger
PvdD → SP → DENK → GroenLinks–PvdA → D66 → CDA → NSC → VVD → JA21 → PVV
Onderwijs & Gelijkheid
Meer keuzevrijheid / minder overheid → Meer gelijkheid / sterkere overheid
VVD → JA21 → CDA → NSC → PVV → D66 → DENK → GroenLinks–PvdA → PvdD → SP
Standpunten Onderwijs & Gelijkheid
| Partij | Kernpunten |
|---|---|
| VVD | Keuzevrijheid voor ouders/scholen; steun bijzonder onderwijs; nadruk op prestaties. |
| JA21 | Meer autonomie en marktwerking; ruimte voor selectie; minder overheidsbemoeienis. |
| CDA | Versterken bijzonder onderwijs; waarden en gemeenschap; overheid faciliteert. |
| NSC | Basisvaardigheden centraal; ongelijkheid tegengaan; diversiteit behouden. |
| PVV | Orde en discipline; Nederlandse identiteit; minder nadruk op gelijke-kansenbeleid. |
| D66 | Kansengelijkheid; investeren in leraren en innovatie; minder vroege selectie. |
| DENK | Tegen discriminatie; kansengelijkheid centraal; meer diversiteit en inclusie. |
| GroenLinks–PvdA | Gelijke kansen; meer geld naar achterstandsscholen; minder selectie, meer inclusie. |
| PvdD | Onderwijs voor duurzaamheid en gelijkheid; brede vorming i.p.v. prestatiecultuur. |
| SP | Tegen kansenongelijkheid; meer geld naar publieke scholen; stoppen met marktwerking. |
Wonen & Huurbeleid
Vrije markt / minder regels → Sterke regulering / veel sociale huur
VVD → JA21 → PVV → NSC → CDA → D66 → DENK → SP → GroenLinks–PvdA → PvdD
Standpunten Wonen & Huurbeleid
| Partij | Kernpunten |
|---|---|
| VVD | Meer bouwen door marktpartijen; stimuleren koopsector; beperkte regulering huren. |
| JA21 | Woningbouw stimuleren via markt; minder regels; huurregulering beperkt houden. |
| PVV | Betaalbare woningen vooral voor Nederlanders; beperkt reguleren; kritisch op woningtoewijzing aan statushouders. |
| NSC | Balans tussen markt en regulering; wil huurders beter beschermen; tegelijk sneller bouwen. |
| CDA | Investeren in bouwen; gemengd beleid: regulering waar nodig, marktwerking behouden; focus op gezinnen. |
| D66 | Meer middenhuur en sociale huur; huurregulering versterken; tegelijkertijd inzet op nieuwbouw. |
| DENK | Meer betaalbare huurwoningen; bescherming tegen discriminatie en scheefwonen; regulering vergroten. |
| SP | Sterk reguleren huurmarkt; fors uitbreiden sociale woningbouw; woningcorporaties versterken. |
| GroenLinks–PvdA | Veel meer sociale huur; strikte huurregulering; stevig ingrijpen in markt voor betaalbaarheid. |
| PvdD | Sterke regulering en duurzaamheid centraal; meer sociale huur; nadruk op ecologische woonoplossingen. |
Hypotheekrenteaftrek
Behouden → Volledige afbouw/afschaffing
PVV → JA21 → CDA → VVD → NSC → DENK → D66 → GroenLinks–PvdA → PvdD → SP
Standpunten Hypotheekrenteaftrek
| Partij | Kernpunten |
|---|---|
| PVV | Volledig behouden; huizenbezit beschermen; tegen verdere beperking van de aftrek. |
| JA21 | Behoud HRA; wil lasten op huizenbezit verlagen; ziet aftrek als stimulans voor middenklasse. |
| CDA | Wil HRA grotendeels behouden; geleidelijke aanpassingen mogelijk, maar zekerheid voor huiseigenaren staat voorop. |
| VVD | Afbouw zoals afgesproken doorzetten (aftrektarief verlagen), maar tegen volledige afschaffing. |
| NSC | Voorzichtige verdere afbouw mogelijk; eerlijker verdeling tussen huurders en kopers; geleidelijk invoeren. |
| DENK | Open voor hervorming; wil ongelijkheid huurders–kopers aanpakken, maar tegen plotselinge afschaffing. |
| D66 | Wil HRA sneller afbouwen; lasten verschuiven naar vermogen; huizenmarkt minder scheef maken. |
| GroenLinks–PvdA | Wil sterke afbouw; HRA vooral voor hogere inkomens afschaffen; geld naar betaalbare huurwoningen. |
| PvdD | Wil versnelde afbouw; ziet HRA als subsidie voor overconsumptie en milieubelastend bouwen. |
| SP | Wil volledige afschaffing voor hoge inkomens; drastische hervorming; richten op betaalbare huisvesting i.p.v. fiscale voordelen. |
Kinderopvang
Beperkt / inkomensafhankelijk → Gratis / universeel
PVV → JA21 → VVD → CDA → NSC → DENK → SP → PvdD → GroenLinks–PvdA → D66
Standpunten Kinderopvang
| Partij | Kernpunten |
|---|---|
| PVV | Geen universeel gratis kinderopvang; ondersteuning alleen voor Nederlandse gezinnen; kritischer op kosten en migratie-effecten. |
| JA21 | Tegen gratis opvang voor iedereen; steun afhankelijk van inkomen en werk; wil misbruik tegengaan. |
| VVD | Ruimhartige kinderopvangtoeslag, maar niet volledig gratis; vooral gericht op werkende ouders en arbeidsparticipatie. |
| CDA | Kinderopvang deels inkomensafhankelijk; combinatie werk en gezin ondersteunen; geen volledig gratis opvang. |
| NSC | Betaalbare opvang belangrijk, maar wil gericht beleid; geen universele gratis opvang, maar inkomensafhankelijk en beheerst. |
| DENK | Wil betaalbare opvang voor iedereen; inkomensafhankelijk, met nadruk op kansengelijkheid en inclusie. |
| SP | Vier dagen per week gratis kinderopvang; opvang als publieke voorziening; gelijke kansen voor alle kinderen. |
| PvdD | Gratis kinderopvang als recht; koppeling met duurzaamheid en gezonde voeding; nadruk op gelijkheid. |
| GroenLinks–PvdA | Vier dagen per week gratis opvang voor alle kinderen; universaliteit en kansengelijkheid centraal. |
| D66 | Het verstgaand: gratis kinderopvang bijna volledig invoeren; opvang als recht voor ieder kind, niet gekoppeld aan werk. |
Overheidstekort
Bezuinigen / strikte begrotingsdiscipline → Meer lenen / investeren met tekort
JA21 → VVD → CDA → NSC → PVV → D66 → DENK → GroenLinks–PvdA → PvdD → SP
Standpunten Overheidstekort
| Partij | Kernpunten |
|---|---|
| JA21 | Strikte begrotingsdiscipline; tegen hoge staatsschuld; wil bezuinigen i.p.v. lenen. |
| VVD | Voorzichtig met tekort; wil ruimte houden voor bedrijven en lage belastingen; beperkte investeringen. |
| CDA | Degelijk begrotingsbeleid; investeren mag, maar alleen binnen Europese kaders; voorzichtig met schuld. |
| NSC | Begrotingsdiscipline belangrijk; maar ruimte voor investeringen in zorg en onderwijs; gematigde lijn. |
| PVV | Wil meer uitgeven aan zorg en veiligheid; minder oog voor begrotingsdiscipline; bezuinigen niet prioriteit. |
| D66 | Ruimte om te lenen voor klimaat en onderwijs; begroting in balans op lange termijn; meer investeringsgericht. |
| DENK | Meer investeren in sociale voorzieningen en kansengelijkheid; begroting mag tijdelijk in tekort gaan. |
| GroenLinks–PvdA | Bereid meer te lenen voor klimaat, zorg en onderwijs; tekort gebruiken als investeringsinstrument. |
| PvdD | Meer lenen en investeren voor duurzaamheid en natuur; begroting ondergeschikt aan ecologische doelen. |
| SP | Geen angst voor tekort; wil fors investeren in publieke sector; bezuinigen afgewezen, lasten bij grootkapitaal. |
Hoe een Economie Werkt: Het Eilandverhaal
De tekst is een uitgebreide allegorie die de fundamentele principes van de economie uitlegt, beginnend met een primitieve samenleving op een eiland. De kern van het verhaal draait om productiviteit, kapitaalaccumulatie en innovatie. Door het verhaal van drie eilandbewoners – Able, Baker en Charlie – wordt duidelijk gemaakt hoe sparen, lenen en investeren leiden tot een toename van de welvaart voor alle betrokkenen. Uiteindelijk laat de tekst zien hoe een groeiende economie leidt tot specialisatie, de opkomst van diensten en de introductie van geld als ruilmiddel, waarbij de focus ligt op het belang van gereedschappen en efficiëntie voor het vervullen van menselijke behoeften.
Het Begin
Er waren eens drie mannen — Able, Baker en Charlie — die samen op een eiland woonden. Geen tropisch paradijs hoor, maar een ruige, kale plek zonder luxe. Hun menu? Simpel: vis. Altijd vis. Ontbijt, lunch én diner.
Gelukkig wemelde het rondom het eiland van de wonderlijk identieke vissen, precies groot genoeg om één man een dag te voeden. Maar er was één probleem: er bestond daar nog geen enkele visserijtechniek. Geen hengels, geen boten, geen fancy sonar. Het beste wat ze konden doen, was het water in springen en de glibberige beesten met hun blote handen proberen te grijpen.
Met die onhandige methode lukte het elke man precies één vis per dag te vangen. Net genoeg om morgen weer op te staan en opnieuw te beginnen. Zo draaide hun hele economie: wakker worden, vissen, eten, slapen. Niet bepaald een bruisend bestaan, maar ach — beter dan doodgaan.
In hun supereenvoudige, sushi-gebaseerde samenleving gold één harde regel:
Geen spaargeld!
Geen krediet!
Geen investeringen!
Alles wat gevangen werd, verdween meteen in de pan. Geen voorraad, geen “visbank” voor moeilijke tijden.
Toch waren Able, Baker en Charlie geen domme jongens. Net als ieder ander mens wilden ze hun leven verbeteren. Maar zolang ze per dag maar net één vis konden vangen, zaten ze vast op het minimum om te overleven.
Op een avond, terwijl hij naar de sterrenhemel staarde, zuchtte Able: “Is dit het nou? Er moet toch meer zijn in het leven dan vis vangen met mijn handen?”
Hij droomde van betere, hippe palmbladkleding. Van een hut die de moesson kon trotseren. En — jawel — van een carrière als filmregisseur. Maar hoe kom je ooit toe aan dromen als je de hele dag achter vissen aanzit?
Toen begon er iets te ratelen in zijn hoofd. Wat nou als hij een apparaat zou maken dat de hand van de mens verlengt én de vis minder kans geeft om te ontsnappen? Een geniale ingeving: een net! Daarmee kon hij in minder tijd méér vissen vangen. En met de vrijgekomen tijd kon hij zich eindelijk richten op zijn kledinglijn, een degelijk dak boven zijn hoofd en natuurlijk dat briljante filmscenario.
De orkestmuziek begon in zijn hoofd te zwellen, hij zag het al helemaal voor zich: een leven zonder dagelijkse visdrama’s. Vol goede moed begon hij palmbast tot touw te draaien.
De volgende dag keek Baker hem verbaasd aan. “Wat doe je nou? Op dieet zeker? Straks verhonger je.”
Able straalde: “Nee, ik bouw een apparaat dat me oceanen vol vis gaat opleveren. Als ik klaar ben, zal ik minder hoeven vissen en nooit meer honger lijden.”
Charlie rolde met zijn ogen. “Dit is waanzin, ik zeg je… waanzin! En als het mislukt, kom je niet bij mij bedelen om een stukje vis.”
Maar Able liet zich niet ontmoedigen en vlocht rustig door. Aan het eind van de dag was het zover: zijn net was klaar. Hij had, zonder dat hij het zo noemde, kapitaal gecreëerd — en dat met lege maag.
Die nacht lag hij hongerig in het zand, terwijl Baker en Charlie tevreden knorden met volle buiken. Maar in zijn hoofd dansten de vissen hem al tegemoet. Hij wist: morgen komt mijn moment.
En inderdaad: de volgende ochtend werd hij eerst nog uitgelachen.
“Leuk hoedje!” grinnikte Baker.
“Maar een beetje warm voor tennis,” voegde Charlie toe.
Able haalde zijn schouders op. “Lach maar, jongens. We zullen zien wie er lacht als ik tot aan mijn oksels in de visdarmen sta.”
Onhandig waggelde hij de branding in met zijn vreemde uitvinding. Maar na wat stuntelen kreeg hij de slag te pakken en — hap! — de eerste vis zat erin.
Baker en Charlie stopten met lachen. Een uur later trok Able zijn tweede vis van de dag op het strand. Hun monden vielen open: normaal kostte het hen een hele dag om er maar één te vangen!
En zo veranderde de economie van het eiland in één klap. Able had zijn productiviteit verdubbeld. Niet alleen goed voor hem, maar uiteindelijk ook voor iedereen.
Terwijl hij naar zijn vangst keek, dacht hij triomfantelijk: “Met één dag vissen kan ik nu twee dagen eten. Dat betekent dat ik elke andere dag iets anders kan doen. De mogelijkheden zijn eindeloos!”
Uitleg
Doordat Able zijn productiviteit had verdubbeld, kon hij nu méér produceren dan hij zelf nodig had om op te eten. En precies dáár begint de magie van economie: uit hogere productiviteit vloeien alle andere voordelen voort.
Voor hij zijn gok waagde en dagenlang met een knorrende maag een net zat te vlechten, bestond er op het eiland geen enkele vorm van spaargeld. Alles wat werd gevangen, werd dezelfde dag nog opgesmikkeld. Maar doordat Able bereid was dat risico te nemen en zichzelf één dagje honger te gunnen, had hij het allereerste stuk kapitaal van het eiland gebouwd: een net!
En dat net leverde meteen meer vis op dan hij kon verstouwen. Overschot! Reserve! Voorraad! (En om dit sprookje werkbaar te houden, doen we even alsof vis nooit bederft.)
Dat beetje extra productie, die spaarpot in de vorm van vis, is het levenssap van elke gezonde economie. Vanaf dat moment veranderde alles: het eiland had niet langer alleen maar een dagelijks overlevingsritme, maar een echte basis om te groeien.
Voor alle diersoorten — behalve de onze — draait economie in feite maar om één ding: dag tot dag overleven. Voedsel is schaars, het weer is genadeloos, roofdieren liggen op de loer, ziektes zijn verraderlijk, en echte innovaties komen maar zelden voor. Het beste wat dieren kunnen bereiken, is een schamele overleving… met tussendoor nog net genoeg tijd voor voortplanting.
Meer is beter....
Wij mensen zouden precies hetzelfde lot hebben (zoals trouwens nog helemaal niet zo lang geleden het geval was), ware het niet voor twee dingen: ons grote brein en onze handige handen. Door die twee samen te gebruiken, zijn we erin geslaagd gereedschappen en machines te maken die ons vermogen om méér uit onze omgeving te halen enorm vergroten.
Econoom Thomas Woods daagt zijn studenten graag uit met een gedachte-experiment: stel je voor dat alle machines en gereedschappen plotseling verdwijnen. Auto’s, tractors, hoogovens, schoppen, kruiwagens, zagen, hamers, speren… alles! Pats, foetsie! En alles wat we consumeren, zouden we weer met onze blote handen moeten jagen, verzamelen, planten en maken.
Dat zou niet fraai zijn. Stel je voor hoe lastig eten wordt als je groot wild te lijf moet gaan met je tanden, vuisten en nagels. Vergeet het maar. Een konijn zou misschien nog wel lukken… maar ja, je moet het eerst nog vangen. Groenten verbouwen? Oogsten met je handen, en geen zakken om de boel in te stoppen. Kleren en meubels maken? Zonder fabrieken, zonder scharen, zonder spijkers? Succes ermee.
Ondanks ons verstand zouden we economisch gezien niet beter af zijn dan chimpansees of orang-oetans.
Gereedschappen maken echt het verschil. Ze maken een economie mogelijk. Speren helpen ons bij de jacht, schoppen bij het planten van gewassen, en netten bij het vangen van vis. Al die hulpmiddelen versterken de kracht van ons werk. Hoe meer we kunnen maken, hoe meer we kunnen consumeren, en hoe welvarender ons leven wordt.
De simpelste definitie van economie is dan ook: het zo goed mogelijk benutten van schaarse middelen (en bijna álles is schaars) om zoveel mogelijk menselijke behoeften te vervullen. Gereedschappen, kapitaal en innovatie zijn de sleutels van die vergelijking.
Met dat in gedachten is het makkelijk te zien wat een economie laat groeien: telkens betere manieren vinden om méér dingen te maken die mensen graag willen hebben. En dat principe verandert nooit — hoe groot een economie uiteindelijk ook wordt.
We gaan door met het sprookje...
Able, de ondernemer van het eiland, leek een glanzende toekomst tegemoet te gaan. Maar wat betekende dat voor de rest? Was er niet net een klassenverschil ontstaan — de ‘haves’ en de ‘have-nots’? Zou Baker en Charlie’s leven nu slechter worden door Able’s succes? Waarschijnlijk niet. Want ook al had Able helemaal niet de bedoeling om iemand anders te helpen dan zichzelf, zijn kapitaal zou uiteindelijk iedereen ten goede komen.
Toen Baker en Charlie zagen hoe makkelijk Able nu zijn vissen binnenhaalde, konden ze hun nieuwsgierigheid niet bedwingen.
“Hé, Able,” zei Charlie, “je gebruikt dat ding maar om de dag. Laat mij het dan gebruiken als jij iets anders gaat doen.”
“Kom op, deel een beetje van de rijkdom, vriend,” voegde Baker toe.
Maar Able was niet van gisteren. Hij herinnerde zich zijn eigen hongerige dagen, hun spottende opmerkingen, en bovenal het risico dat hij had genomen. Wat als ze mijn net kapotmaken? Wat als ik het nooit terugkrijg? Dan ben ik weer terug bij af. Dag designer palmbladmode! Dus hield hij de boot af: “Sorry jongens, geen sprake van. Ik heb mijn eigen net gemaakt, dus jullie kunnen dat ook. Het voordeel is dat je nu in elk geval wéét dat het werkt!”
Charlie fronste. “Maar hoe weet ik dat ik het goed doe? Ik heb nog nooit zoiets gemaakt. En bovendien: ik kan niet zo goed tegen honger, ik ga ervan trillen. Voor ik een fatsoenlijk net heb, ben ik waarschijnlijk al verhongerd.”
Baker dacht even na en kwam met een ander voorstel. “Oké gierigaard, jij wilt ons geen gunsten doen, dat begrijpen we. Maar wat als je ons een paar van je reservevissen uitleent om van te leven terwijl we ons eigen net maken? Dan verhongeren we niet, en we betalen je elke vis netjes terug zodra we extra hebben gevangen.”
Dat klonk al beter, maar Able bleef sceptisch. “En wat als jullie gewoon een dagje op het strand gaan liggen bakken in de zon? Of wat als jullie netten helemaal niet werken? Dan krijg ik mijn vissen nooit meer terug en ben ik mijn spaargeld kwijt. Nee hoor, daar trap ik niet in.”
Baker en Charlie begrepen dat hij een punt had: ze vroegen hem eigenlijk om risico te nemen zonder er zelf iets voor terug te doen. Toch lonkte het vooruitzicht van extra vis te sterk. Dus broedden ze verder en bedachten een deal.
“Luister,” zei Baker, “laten we een afspraak maken: voor elke vis die jij ons uitleent, betalen wij er twee terug. Honderd procent winst! Waar anders op dit eiland ga je zo’n rendement halen?”
Dat trok Able’s aandacht. Zijn ogen begonnen te glimmen. “Nu wordt het interessant!” Hij rekende snel: als ik twee vissen uitleen en vier terugkrijg, ben ik zonder enig werk twee vissen rijker. Ik word gewoon een vistycoon!
Het leek bijna alsof hij de snor van een Hollywoodschurk stond te twirlen. Maar in werkelijkheid was het minder sinister dan het klonk. Want ook al wilde Able alleen zijn eigen voorraadkast vullen, zijn zogenaamde “hebzucht” zorgde ervoor dat de anderen een kans kregen die ze anders nooit gehad zouden hebben.
Toch had Able meerdere opties:
-
Hij kon gewoon zijn vissen bewaren voor later. Veilig, maar dan groeide zijn spaargeld niet.
-
Hij kon zijn spaargeld gewoon zelf opeten. Lekker, maar weg spaargeld.
-
Hij kon een heuse nettenverhuur beginnen. Twee extra netten bouwen, die verhuren voor een halve vis per dag, en voilà: hij had genoeg inkomen om nooit meer zelf te vissen. Hallo, vervroegd pensioen!
-
Hij kon, zoals Baker voorstelde, zijn vissen uitlenen tegen rente — met het risico dat hij ze nooit terugzag.
Keuzes, keuzes, keuzes.
Kort samengevat: met spaargeld kun je vijf dingen doen — sparen, consumeren, uitlenen, investeren, of een slimme mix van dit alles.
Uiteindelijk hakte Able de knoop door: hij besloot de lening te verstrekken.
Uitleg
Voor sommigen leek het misschien alsof Able zijn voordeel gebruikte om zijn behoeftige buren uit te buiten. En ja, hij maakte winst zonder zelf extra te werken. Maar dat betekende niet dat hij zomaar “iets voor niets” kreeg. Zijn winst was de vergoeding voor het risico dat hij nam. Bovendien stond zijn winst de vooruitgang van Baker en Charlie helemaal niet in de weg.
Doordat Able zijn spaargeld wilde laten renderen, kregen Baker en Charlie de kans om hun eigen netten te bouwen zonder zichzelf uit te hongeren. Lukte het hen, dan hadden ze hun economische toekomst verbeterd én hun magen gevuld. Alles wat daarbovenop kwam was bonus — of beter gezegd: extra visolie. En als het mislukte, en ze hun lening niet konden terugbetalen? Dan draaide Able zelf voor het verlies op. Kortom: een geldschieter kan alleen profiteren als de lener óók profiteert.
Natuurlijk zien niet alle mensen die wederzijdse voordelen even duidelijk. Stel je eens voor dat Baker en Charlie, jaloers op Able’s groeiende rijkdom, besloten dat ze recht hadden op een deel van zijn spaargeld.
“Moet je die vent zien pronken in zijn chique palmblad-smokings,” mopperde Baker, “terwijl wij ons elke dag in het zweet werken met glibberige vissen. Heeft hij nog nooit van liefdadigheid gehoord? Hij kan mij toch gerust een visje of twee missen, zodat ik af en toe een dagje vrij kan nemen? Hij heeft er zoveel liggen dat hij het verschil niet eens zou merken.”
Charlie knikte instemmend. “Ja, deel die rijkdom eens, elitaire visbaron!”
Of stel je een ander scenario voor: dat Able zich schuldig voelde over zijn rijkdom en zich liet overhalen om gewoon wat vissen weg te geven, zonder er iets voor terug te vragen. Wat zouden Baker en Charlie dan doen met die gratis vissen?
Waarschijnlijk zouden ze de kans grijpen om lekker een dagje niets te doen. En hoewel er natuurlijk helemaal niets mis is met ontspanning (sterker nog, het is vaak het uiteindelijke doel van al ons werk), zou hun vakantie geen enkel visje extra aan de economie toevoegen. Dus hoe edelmoedig het ook klinkt, liefdadigheid zou de productiviteit van het eiland niet verhogen. Een lening daarentegen wél.
De kern van het verhaal: alles wat leidt tot méér vissen (lees: productie), komt het hele eiland ten goede. Hoe meer vis er is, hoe meer mogelijkheden er zijn — om meer te eten, om andere dingen te doen naast vissen… of simpelweg om een dagje helemaal niets te doen.
Sommigen zullen zich afvragen: wat als Able een échte gierigaard blijkt te zijn, die al zijn nieuwe rijkdom alleen maar gebruikt om steeds rijker en rijker te worden?
Is dat werkelijk een gevaar? Niet echt. Want de enige manier waarop zijn spaargeld kan groeien (zonder dat hij zelf werkt), is door het beschikbaar te maken voor de andere eilandbewoners. Als hij het oppot, gebeurt er niets: zijn rijkdom blijft gelijk of slinkt gewoon doordat hij het zelf opeet. Het mooie van particulier kapitalisme is juist dat zelfs wie alléén door eigenbelang wordt gedreven, gedwongen wordt om de levensstandaard van anderen mee omhoog te trekken.
Belangrijk inzicht
Rijkdom is altijd relatief. In een primitieve samenleving waar nauwelijks iets geproduceerd wordt, kan zelfs de rijkste man niet tippen aan het materiële welzijn van de armste in een geïndustrialiseerde economie. In de Middeleeuwen misten zelfs de machtigste koningen basisgemakken die tegenwoordig in elk doorsnee huishouden te vinden zijn: centrale verwarming, stromend water en verse groente in de winter.
Baker en Charlie zouden misschien dromen dat twee vissen per dag pure luxe is. Maar vanuit ons perspectief is dat nauwelijks jaloersmakend. Toch vinden veel mensen het oneerlijk dat er verschillen in rijkdom bestaan. Vaak leeft de gedachte dat de rijken rijk worden ten koste van de armen. In de moderne economie heet dat ook wel de “arbeidswaardetheorie”: het idee dat winst ontstaat door arbeiders minder te betalen dan ze waard zijn. In dat denkbeeld kunnen ondernemers — of dat nu Able is of een multinational — alleen rijk worden door anderen arm te maken.
Maar dat klinkt moreel verontwaardigd, en heeft weinig met de werkelijkheid te maken. Rijkdom ontstaat omdat iemand iets van waarde biedt. Able biedt leningen aan wie zelf geen spaargeld heeft. Als hij winst maakt, komt dat alleen doordat de dienst die hij levert waardevol is voor anderen.
Natuurlijk, als Able een bullebak zou zijn die simpelweg de helft van de vangst van zijn buren afperste, dán was zijn rijkdom direct verbonden met hun armoede. Maar dat soort dwang voegt niets toe aan de productieve capaciteit van het eiland. Hij zou slechts afpakken wat anderen hadden geproduceerd. Sterker nog, de totale productie zou waarschijnlijk dalen, omdat de slachtoffers minder gingen werken zodra ze beseften dat hun inzet toch gestolen werd.
Geschiedenis staat bol van zulke voorbeelden van dwang: slavernij, horigheid, lijfeigenschap. Ja, mensen werken onder druk, maar veel beter werken ze wanneer ze zélf profiteren van hun arbeid.
Helaas is grootschalige economische vrijheid zeldzaam in de wereldgeschiedenis. Maar wanneer eigenbelang de ruimte krijgt, groeit de productieve capaciteit razendsnel. Het gebruik van krediet is daar een perfect voorbeeld van: zolang geldschieters en leners vrij zijn om hun eigen voorwaarden af te spreken, profiteren uiteindelijk alle partijen. Maar — zoals we later zullen zien — kan die markt flink verstoord worden door invloeden van buitenaf. En dan, tja… meestal eindigt dat in een ramp.
Dankzij Able’s bereidheid én vermogen om leningen te verstrekken, hadden Baker en Charlie nu ook netten die ze eerder niet bezaten. Met netten voor iedereen was de gezamenlijke visvangst van het eiland gestegen van drie vissen per dag naar zes. De economie was in één klap verdubbeld, en de toekomst zag er ineens een stuk rooskleuriger uit.
Maar dit gebeurde niet alleen omdat de drie mannen ontevreden waren met hun karige leventje. Hun honger — of zoals economen het noemen: “vraag” — was wel nodig om groei aan te wakkeren, maar niet voldoende om het voor elkaar te krijgen.
Vraag naar méér is menselijk. Wat we ook hebben, we willen altijd meer. Misschien niet altijd meer spullen, maar wél meer tijd, meer plezier en meer keuzemogelijkheden. En dat vraagt allemaal om extra kapitaal. Waarschijnlijk klaagden Able, Baker en Charlie al járen over hun visdieet. Het verschil was dat ze nu eindelijk hun productiviteit konden vergroten om die wensen waar te maken.
Met hun extra vissen konden de eilandbewoners nu eindelijk meer dan één vis per dag eten. Maar let op: de economie groeide niet omdat ze meer consumeerden. Nee, ze consumeerden meer omdat de economie groeide. Klinkt logisch, toch? Toch is het verbazingwekkend hoeveel moderne economen erin slagen om zo’n eenvoudig idee ingewikkeld te maken.
Veel economen denken namelijk dat je vraag kunt vergroten door mensen simpelweg meer geld te geven. Maar dat verandert de werkelijke vraag helemaal niet — het verandert alleen hoeveel ze kunnen uitgeven aan wat er al geproduceerd is. Pas als de productie toeneemt, kunnen mensen echt méér krijgen van wat ze willen.
We gaan door met het sprookje...
Na een paar weken vingen Able, Baker en Charlie vissen bij de vleet met hun nieuw gebouwde netten. Twee vissen per dag per persoon werd de nieuwe standaard. Na dat magere dieet van één vis per dag kon je ze moeilijk kwalijk nemen dat ze nu wat meer namen. Maar, omdat ze inmiddels hadden geproefd van de voordelen van zelfopoffering, besloten ze een deel van die overvloed toch opzij te leggen. Om de paar dagen deden ze het gewoon weer met één vis per persoon, en de rest ging in de spaarpot.
Doordat ze niet meer elk wakkere moment hoefden te vissen, kregen ze eindelijk de vrijheid om zich met andere nuttige én plezierige dingen bezig te houden. Able stortte zich op het ontwerpen van functionelere — en eerlijk is eerlijk, véél stijlvollere — palmbladkleding. Baker verrijkte zijn dieet en kookkunsten door kokosnoten te verzamelen, en Charlie bouwde de allereerste hut van het eiland.
Alles ging prima, maar Baker kreeg al snel grotere dromen. “Als we met handnetten de productie kunnen verdubbelen,” zei hij, “waarom dan niet een stap verder? Laten we industrieel gaan!” Hij schetste plannen voor een revolutionair visvangsysteem: een gigantische onderwaterval met éénrichtingsdeuren. Vissen konden er wel in… maar niet meer uit. Een soort hotel zonder uitcheckbalie.
Als het werkte, hoefden ze nooit meer zelf te vissen!
Maar al gauw zag Baker dat dit project veel te groot was om in zijn eentje te trekken. Het materiaal, het vlechtwerk, het bouwen… zijn spierkracht, spaargeld en slimheid schoten tekort voor zo’n megaklus. Dus stelde hij een joint venture voor: samen een bedrijf oprichten, hun spaargeld bundelen, en een hele week besteden aan de bouw.
Natuurlijk waren er risico’s. Net als bij Able’s eerste net was er geen enkele garantie dat het zou werken. En zelfs als het werkte, kon het gevaarte bij de eerste ruwe zee in stukken breken. Alleen dit keer stond er niet één vis op het spel, maar meer dan twintig!
Toch won hun honger naar méér vis het van de angst om hun spaargeld kwijt te raken. Dus besloten ze ervoor te gaan.
Na een week keihard ploeteren stond hij er: de allereerste megavanger van het eiland. En hij deed wat hij beloofde: gemiddeld twintig vissen per week, bijna zonder moeite. Af en toe een reparatie of beetje onderhoud, maar verder liep het ding bijna vanzelf. Al snel dreven ze in de vissen.
Met de snel groeiende spaarvoorraad bouwden ze al gauw nóg een mega-vanger. Vissen werden zo overvloedig dat ze hun tijd volledig konden wijden aan andere projecten.
Charlie gebruikte zijn spaargeld om surfplanken te bouwen, waarmee hij een ultracoole nieuwe vrijetijdsbesteding introduceerde.
Able richtte een heuse kledinglijn op, zodat niet alleen hijzelf maar iedere eilandbewoner zijn imago kon opfrissen. In zijn vrije tijd begon hij zelfs aan zijn eenmans-toneelstuk.
En Baker? Die stortte zich op het hardnekkige transportprobleem van het eiland en ontwierp de allereerste kano én de eerste kar.
--
Dezelfde economische regels die gelden in een eenvoudige samenleving, zijn ook van kracht in een ingewikkeldere. Able’s eerste stap — kapitaal scheppen door persoonlijke opoffering — had niet alleen hemzelf, maar alle eilandbewoners geholpen. Dankzij zijn verstandige leenprogramma kwamen er steeds meer handnetten, en die productiviteit werd vervolgens benut om nóg efficiëntere visvangmachines te bouwen. Het resultaat: een beter dieet, mooiere kleding, makkelijker vervoer, vrije tijd én zelfs een beginnende surfcultuur.
De verhalen over deze ongekende luxe verspreidden zich al snel naar andere eilanden, waar men nog altijd met de blote hand viste en geen tijd had om op een surfplank te staan. Al gauw kwamen er immigranten op zoek naar een beter leven.
De hogere productiviteit maakte dat het eiland een grotere bevolking kon onderhouden, en die bevolking zorgde op haar beurt voor meer economische diversiteit. Sommigen gingen werken bij de mega-vangers, anderen leenden vissen om land vrij te maken voor landbouw — eindelijk een gebalanceerd dieet! — en weer anderen stapten in allerlei nieuwe beroepen. Zo ontstonden er huttenbouwers, kano-bouwers, wagenmakers, noem maar op.
Doordat voedsel en gereedschappen zo efficiënt werden geproduceerd, hoefden sommige mensen zelf niets tastbaars meer te maken om te overleven. Zo werd de dienstensector geboren.
Een paar creatieve eilanders vonden dat rauwe vis best wat spannender kon. Met kruiden en vuur ontwikkelden ze heuse kookkunsten. Hun gerechten werden zó gewaardeerd dat vissers en huttenbouwers bereid waren een deel van hun vangst in te ruilen voor een goede maaltijd. Charlie’s nakomelingen zagen hoe populair surfen werd en begonnen zelfs een surfschool.
Naarmate er meer beroepen en diensten kwamen, ontstond er behoefte aan een ruilmiddel. Het oude systeem — ruilhandel — was omslachtig. Stel: een speermaker wilde lekker eten, maar de kok had geen speer nodig. Hoeveel maaltijden zou één speer eigenlijk waard zijn? Het was tijd voor iets universeels: geld.
En wat lag meer voor de hand dan vis? Iedereen at ze, iedereen kende hun waarde. Eén vis stond nog altijd gelijk aan één dag overleven. Zo werd vis het betaalmiddel. In korte tijd werden lonen en prijzen uitgedrukt in vissen, en de hele prijslijst van het eiland was gebaseerd op de intrinsieke waarde van die ene vis.
Efficiëntie en specialisatie
Een economie waarin mensen zich kunnen specialiseren is altijd sterker dan een samenleving waar iedereen hetzelfde doet. Specialisatie verhoogt de productie en dus de welvaart.
Neem Duffy, een eilandbewoner met talent voor houtbewerking. De gemiddelde eilandbewoner deed vijf dagen over het bouwen van een kano. Omdat hij in die tijd niet viste, kostte hem dat tien vissen aan gemiste inkomsten. Duffy kon echter een kano in vier dagen maken. Voor hem betekende dat maar acht vissen aan gemist inkomen. Hij kon dus winst maken door een kano te verkopen voor negen vissen. Voor anderen een koopje, want zij zouden er zelf tien vissen aan kwijt zijn. Iedereen won.
Maar negen vissen was voor velen nog een hoop geld. Alleen de rijksten konden zich een kano veroorloven, de rest moest sparen en intussen maar blijven zwemmen.
Tot Duffy besloot zijn spaargeld te investeren in gereedschap, speciaal om kano’s mee te maken. Net zoals Able generaties eerder deed, consumeerde hij minder om kapitaalgoederen te creëren. Met beter gereedschap halveerde zijn bouwtijd naar twee dagen. Nu hoefde hij maar vier vissen aan kosten goed te maken. Verlaagde hij zijn prijs naar zes vissen, dan was hij niet alleen winstgevender (twee vissen winst per kano in plaats van één), maar kon hij ook twee keer zoveel kano’s produceren.
Dit was niet alleen goed voor Duffy, maar voor het hele eiland. Meer mensen konden zich een kano veroorloven tegen zes vissen, zijn klantenkring groeide en kano’s werden van luxeartikel een gebruiksvoorwerp voor iedereen. Dankzij sparen, innovatie en investering daalden de prijzen, en de voordelen van kano-bezit waren niet langer voorbehouden aan de rijken.
Uitleg
Zoals we in het verhaal van Duffy hebben gezien, doen dalende prijzen hem helemaal geen pijn. Integendeel: naarmate prijzen overal dalen door vergelijkbare productiviteitsstijgingen in andere beroepen, kan hij met dezelfde vissen méér dingen kopen.
Innovatie is eenrichtingsverkeer. Tenzij mensen plots alles vergeten wat ze ooit geleerd hebben, stapelt efficiëntie zich alleen maar op. Het gevolg? Prijzen hebben de neiging om op de lange termijn te dalen.
En dat heeft nog een bijkomend effect: dalende prijzen moedigen sparen aan. Want als eilandbewoners doorhebben dat hun vis in de toekomst méér kan opleveren dan vandaag, dan houden ze er liever een paar achter de hand. Hoe gek het ook klinkt: een vis gespaard is écht een vis verdiend. En dat sparen vergroot de hoeveelheid kapitaal die beschikbaar is voor leningen.
Werkgelegenheid
Naarmate de samenleving complexer werd, besloten steeds meer eilandbewoners om voor anderen te werken en hun arbeid te ruilen voor loon.
De waarde van arbeid wordt altijd vermenigvuldigd door het gebruik van kapitaal. Hoe beter het kapitaal, hoe waardevoller de arbeid. Met een bulldozer graaf je immers een véél groter gat dan met een schep, ook al span je je met beide even hard in. Het is dus altijd slimmer om met het beste kapitaal te werken dat beschikbaar is.
In een vrije samenleving kiezen de bewoners zelf wiens kapitaal ze gebruiken om hun arbeid te versterken. Op een paar artistieke types na, die er vrijwillig voor kozen “zonder net te vissen”, had elke arbeider drie mogelijkheden:
-
Zelf onderconsumeren en een net bouwen.
-
Een lening afsluiten om een net te kopen.
-
Of werken voor iemand die al een net heeft.
Omdat de eerste optie zelfopoffering vraagt en de tweede risico met zich meebrengt, kozen de meeste eilanders voor optie drie. En dan kregen ze loon.
Zo kwam Finnigan, een nieuwkomer op het eiland. Een sterke kerel, maar als visser weinig succesvol. Dus besloot hij zich te specialiseren in vistransport. Met puur spierballenwerk kon hij 100 vissen per dag van het strand naar de hutten slepen. Tegen een vrachtprijs van 2% verdiende hij daar twee vissen per dag mee.
Maar hij kreeg stevige concurrentie van Murray’s Kar-bedrijf. Murray had eerder een lening afgesloten om een viskar te bouwen. Daarmee kon hij 300 vissen per dag vervoeren, ook al was hij lang niet zo sterk als Finnigan. Dankzij zijn hogere productiviteit kon hij een tarief van slechts 1% rekenen en tóch drie vissen per dag verdienen. Lager tarief, méér winst.
Zonder kapitaal zat Finnigan dus klem. Maar Murray rook een kans: hij zag dat Finnigan met een kar wel 400 vissen per dag zou kunnen vervoeren. Tegen 1% leverde dat vier vissen per dag op. Dus bood Murray hem een baan aan: drie vissen per dag loon. De vierde hield hij zelf als winst.
Voor Finnigan was het aantrekkelijk: met hetzelfde werk werd hij productiever, kon hij lagere tarieven vragen én meer verdienen dan alleen. Murray verdiende één vis per dag extra en kon ondertussen stoppen met zelf vissen sjouwen. Zo had hij tijd om meer karren te bouwen en meer mensen in dienst te nemen.
En hoe meer karren er kwamen, hoe lager de vrachtkosten voor alle eilanders.
Misschien zou Finnigan later genoeg kunnen sparen om zelf een kar te bouwen en zo zijn oude baas te beconcurreren. Om dat te voorkomen, moest Murray hem méér betalen dan hij alleen ooit had kunnen verdienen — genoeg om hem tevreden te houden.
Maar laten we niet vergeten: Murray deed dit allemaal uit winstbejag, niet uit liefdadigheid. Toch profiteerde Finnigan mee met een beter loon, en profiteerden álle eilanders door lagere kosten.
Overige thema's banken, (internationale)handel, .....en meer.
Klassiek versus Keynesiaans
Klassiek vs. Keynesiaans economisch denken
|
Klassiek economisch denken |
Keynesiaans economisch denken |
|
|---|---|---|
|
Tijd |
18e–19e eeuw (Smith, Ricardo) |
20e eeuw (John M. Keynes) |
|
Motor economie |
Aanbod (productie, ondernemers, kapitaal) |
Vraag (consumptie, investeringen, overheidsuitgaven) |
|
Marktwerking |
Markt herstelt zichzelf, altijd evenwicht |
Markt kan blijven steken in crisis |
|
Overheid |
Minimaal ingrijpen (“laissez-faire”) |
Actief ingrijpen nodig in slechte tijden |
|
Werkloosheid |
Tijdelijk, verdwijnt vanzelf |
Kan langdurig blijven bestaan |
|
Oplossing crisis |
Wachten tot lonen dalen → werk komt terug |
Overheid stimuleert vraag (bijv. investeringen, subsidies) |
|
Overheidsfinanciën |
Altijd in evenwicht houden |
Tekorten toegestaan in recessie, sparen in hoogconjunctuur |
|
Beeldspraak |
Economie = zelfregulerend mechanisme |
Economie = auto die soms moet worden aangeduwd |
Kennis-Checks
Doel
Het doel van de Kennis-Checks is (op volgorde van prioriteit):
- controle op het beheersen van de theorie uit een blok;
- controle of de stof voldoende zelfstandig is doorlopen;
- het vroegtijdig kunnen signaleren van studenten die ‘duiken’;
- het creëren van een (extra) leermoment.
Planning
Elk blok wordt afgesloten met twee Kennis-Checks.
De eerste wordt afgenomen nadat het blok is doorlopen volgens de nominale planning (3-jarig).
De tweede wordt ongeveer twee weken later gepland.
Naast deze twee Kennis-Checks worden geen reguliere herkansingen geboden.
Voldoende
De Kennis-Check is multiplechoice en bevat rond de 25 vragen met elk 4 tot 6 antwoordmogelijkheden.
De score wordt berekend als het percentage goede antwoorden, zonder rekening te houden met de gokfactor.
Bij 25 vragen en gemiddeld 5 antwoordmogelijkheden moet een student volgens de algemeen geldende norm 16 vragen goed hebben voor een voldoende. Daarbij wordt impliciet uitgegaan van 20% gokscore (1 op 5). Wij hanteren de norm 13.
Eis
Score per blok
De hoogste score per blok geldt.
Om studenten gemotiveerd te houden om ook na het behalen van een voldoende de tweede kans serieus te benutten, krijgt een student die beide keren een voldoende haalt 2 procentpunten bij zijn/haar hoogste score.
Voorbeelden
| Score 1 | Score 2 | Eindresultaat |
| 54 | 71 | 71 |
| 72 | 53 | 72 |
| 71 | 73 | 75 |
Score over meerdere blokken
Om over meerdere blokken te bepalen of aan de eis wordt voldaan geld:
- De laatste twee blokken moeten beiden voldoenden(55% of hoger) zijn
- Het gemiddelde over alle blokken moet voldoende zijn (55% of hoger).
Of anders uitgelegd:
| Periode | Eis | |
| 1 | - | Voldoende voor blok 1 én 2. |
| 2 | Voorlopig Studieadvies | Voldoende gemiddeld over blok 1 t/m 4 én voldoende voor blok 3 én 4. |
| 3 | Definitief Studieadvies | Voldoende gemiddeld over blok 1 t/m 6 én voldoende voor blok 5 én 6. |
| 4 | Studiecontract/overgang | Voldoende gemiddeld over blok 1 t/m 8 én voldoende voor blok 7 én 8. |
Herkansing
Indien in periode 2, 3 of 4 niet aan de eis is voldaan, kan een beroep worden gedaan op uitzonderlijke omstandigheden. De student kan dan verzoeken om één herkansing. Het verzoek moet onderbouwd zijn en de zorgcoördinator bepaalt, eventueel aan de hand van een extra gesprek, of het verzoek kan worden gehonoreerd.
--
zie voor versnellen: https://www.roc.ovh/books/overig-notes/page/versnellen
Versnellen
1. Uitgangspunt: Nominale planning
Het eerste leerjaar is opgebouwd rond een nominaal leerschema waarin studenten acht inhoudelijke blokken afronden binnen één schooljaar.
Op basis van dit schema worden instructiemomenten en ondersteuning gepland, met als doel: alle studenten richting het beoogde uitstroomniveau begeleiden.
2. Differentiatie in leertrajecten
Om tegemoet te komen aan verschillen in tempo, behoefte en prestaties, hanteren wij vier niveaus van differentiatie. De indeling is dynamisch en wordt periodiek geëvalueerd door de eerstejaars Dev-docent in overleg met SLB’ers.
2.1 Nominaal traject
Studenten in dit traject volgen de reguliere route van acht blokken per jaar.
De totale verwachtte studieduur voor deze studenten is 3 jaar.
Zij ontvangen instructie en begeleiding volgens het standaardrooster. Dit rooster wordt in de eerste weken van het schooljaar voor het hele jaar opgesteld.
2.2 Nominaal Plus (versnellen)
Studenten die zelfstandig en ambitieus willen werken, kunnen in aanmerking komen voor versnelling.
Voorwaarden voor deelname aan dit traject zijn:
- De student geeft zelf aan te willen versnellen.
- De student heeft geen achterstand ten opzichte van het nominale schema.
- De student loopt voor en op het nominal schema en is 1.5 keer verder (150%).
- De eerstejaars Dev-docent geeft toestemming. De houding in de klas is goed.
- De student heeft minimaal 65% gescoord op de kennistoetsen.
- De presentie is ruim voldoende 90% of meer en in ieder geval > 80%.
- Deelname aan het wekelijkse ‘versnellerslesuur’ is verplicht.
Versnellen gebeurt altijd in groepjes: het is een gezamenlijke, zelfstandige aanpak waarbij studenten elkaar ondersteunen.
Bij slechts één student kan versnellen beperkt of vervangen worden door maatwerkverdieping of een ondersteunende rol binnen reguliere lessen.
Samengevat
| Aanweigheid | minimaal 80% |
| Kennis Check Scores | minimaal 65% |
| Voortgang | 150% van nominaal (8 blokken per jaar) |
2.3 Kleine achterstand (opstroomtraject)
Studenten die achterlopen maar nog minimaal 70% van de nominale voortgang behalen, vallen onder deze categorie.
Zij krijgen wekelijkse verplichte extra ondersteuning op school met als doel terug te keren naar het nominale schema.
De begeleiding is gericht op het inhalen van de achterstand en het weer kunnen aansluiten bij het nominale beeld.
2.4 Grote achterstand
Studenten met een forse achterstand (onder de 70%-norm) krijgen intensieve begeleiding.
- Zij worden besproken met de zorgcoördinator (ZoCo).
- Samen met SLB en ZoCo wordt gekeken of de achterstand inhaalbaar is.
- Heroriëntatie op een andere opleiding kan onderdeel zijn van dit traject.
3. Evaluatie en monitoring
- De eerste herziening van de classificatie vindt plaats na afronding van Blok 1.
- Daarna kan de classificatie na elk blok (ongeveer elke 4 weken) worden aangepast indien gewenst.
- De status wordt besproken in het SLB-overleg met de eerstejaars Dev-docent en indien nodig aangepast.
- Ouders/verzorgers van studenten onder de 18 jaar worden verplicht geïnformeerd bij elke wijziging in classificatie.
- Alle classificaties worden vastgelegd in de Canvas Monitor, onder “Aantekening (alleen zichtbaar voor docenten)”.
4. Toetsing en normering
Per blok wordt de voortgang gemeten aan de hand van kennistoetsen.
De minimale norm om een blok als ‘behaald’ te registreren is een kennistoetsscore van 55% of hoger.
De norm voor deelname aan het versnellende traject is 65% of hoger .
--
zie voor kennis-check berekeningen: https://www.roc.ovh/books/overig-notes/page/kennis-checks
Prompt - Atlas - CMON - nakijken
(experimental)
You are an AI assistant that helps a teacher evaluate student homework submissions and output structured grading data.
## Extraction Rules (IDs, attempts, metadata)
- Read each `user_id` from the value next to the user name starting with u:
- Read each `submission_id` from teh value next to the user and user_id, starting with u:
- Read the `assignment_id` from the assignment link in the SAME student block:
`<a href="https://talnet.instructure.com/courses/[COURSE_ID]/assignments/[ASSIGNMENT_ID]">…</a>`
Use that numeric tail as `"assignment_id"`. This can be a comma seperated list.
- Read `course_id` from the same assignment link (the `/courses/[COURSE_ID]/` segment).
- Read the attempt cap string from the rating line, e.g.:
`(Poging 2, max 12/12, vorige score 6)` or `(Poging 4, max 9/12)`
• Attempts = number after “Poging”.
• Visible maximum = first number after “max” (e.g., `12` in `max 12/12`, or `9` in `max 9/12`).
- Read submission timestamp from the block’s date/time label (e.g., `29-10 13:47`) and copy that into `"submitted_at"` as-is.
- Read checked state from the “Rate” checkbox in the block:
• If the “Rate” checkbox is present and checked → `"checked": true`.
• Otherwise → `"checked": false`.
- If any specific ID field is truly missing in the provided HTML, set it to `0` (do not invent values).
## Evaluation Rules
1. Ratings range from 0 to [MAX_POINTS].
2. If all requirements are correct **and** attempts ≤ 3 → give **full points** (but do not exceed visible “max”).
3. If attempts ≥ 4 → the **maximum rating** equals the visible “max” value shown (e.g. “max 9/12” → 9).
4. Give partial points if partly correct; give 0 if missing, unreadable, wrong, or not matching the assignment.
5. Never exceed the visible “max” for that submission (even if [MAX_POINTS] is higher).
6. Consider “Expected Words/Keywords” only as soft guidance; do not over-penalize if evidence in the screenshot/PDF clearly shows correctness.
7. Rate based on the criteria printed right under the student name.
8. Next to the feedback input box, we see the feedback on the previous submission from teh student, this is not rellevant for this submission.
## Feedback Rules
- Language: Dutch or English (match the page language).
- Keep it **short, clear, constructive** — 1–2 sentences max.
- Confirm correctness (or main issue), then give 1 improvement tip.
- Example tone:
- “Netjes gedaan, je hebt de header juist aangepast.”
- “Correct uitgevoerd, maar volgende keer graag één duidelijke screenshot.”
- “Bijna goed — controleer of de tag echt kleiner is dan <h1>.”
- “Omdat dit poging 4 is, iets lagere score.”
## Output Requirements
Return ONLY valid JSON in this exact format — no explanation before or after the JSON:
{
"version": "1.0",
"metadata": {
"cohort": "[COHORT]",
"assignment_id": [numeric from the blocks; if mixed, use 0],
"assignment_name": "[ASSIGNMENT_NAME]",
"course_id": [COURSE_ID or 0],
"course_name": "[COURSE_NAME]",
"created_at": "YYYY-MM-DDTHH:MM:SS.mmmZ",
"total_submissions": [COUNT]
},
"submissions": [
{
"submission_id": [integer from <input name='submission_id[]' value='...'>],
"user_id": [integer from <input name='user_id[]' value='...'> or 0],
"user_name": "Student Name",
"rating": [integer respecting attempt cap and visible max],
"feedback": "Short constructive feedback (1–2 sentences).",
"checked": true,
"submitted_at": "DD-MM HH:MM"
}
]
}
## Notes
- Include **all** submissions that appear in the provided HTML.
- If multiple different assignment IDs are present across blocks, set `metadata.assignment_id = 0` but still fill each block’s IDs (`submission_id`, `user_id`) correctly and keep the shared `course_id` when available; otherwise use 0.
- Ensure valid, parseable JSON (no trailing commas).
Raspberry Pi2 Screen issues
This summary captures the "perfect storm" of hardware and software conflicts you are facing. It is designed to be shared with developers or used as a reference for future troubleshooting.
1. Hardware Inventory
-
Computer: Raspberry Pi 2 Model B (BCM2836 SoC).
-
Display: KeDei 3.5" SPI LCD, Version 3.0 (2015/12/01).
-
Critical Fact: This is a "Legacy" board that uses three 74HC595 shift registers to mimic a parallel interface. It is NOT a standard SPI display.
-
-
Interface: GPIO Pins (SPI Bus 0).
2. Software Environment
-
OS: Raspberry Pi OS "Trixie" (Debian 13) 32-bit with Desktop.
-
Kernel: 6.x (Modern Linux Kernel).
-
Python: 3.13.
-
Drivers: Transitioned from the old
sysfsGPIO interface to the modern Character Device (gpiod) andlgpioarchitecture.
3. The Core Problem: "The Legacy Gap"
The fundamental issue is that 2015 hardware is trying to communicate with a 2025 operating system.
-
GPIO Allocation Conflict: In modern Debian/Trixie, the kernel "claims" pins via the Device Tree. When you try to use
RPi.GPIOorluma.lcd, the OS throws anlgpio.error: 'GPIO not allocated'because it views the Python script as an intruder trying to hijack system-reserved SPI pins. -
Timing Mismatch: The 2015 shift registers require specific, slow timing (latencies) that were easily achieved on old kernels (like Jessie). Modern 64-bit/32-bit kernels use high-speed DMA (Direct Memory Access) for SPI, which sends data faster than the 74HC595 chips can process, resulting in a permanent "White Screen."
-
Driver Deprecation: The original KeDei drivers were binary-blobs compiled for Kernel 3.x/4.x. These are physically incompatible with the Kernel 6.x architecture used in Trixie.
4. Technical Facts for Future Reference
| Fact | Detail |
| Confirmed Working OS | Raspbian Jessie (Legacy Kernel 4.x). |
| Fail Symptom | Persistent White Screen (Backlight on, logic off). |
| Key Error Message | lgpio.error: 'GPIO not allocated' or ImportError for legacy bitbang classes. |
| Incompatibility | Modern vc4-kms-v3d graphics driver conflicts with SPI GPIO access. |
| Bus Speed Limit | Shift registers typically fail above 1MHz to 2MHz on modern Pi hardware. |
| Pin Mapping (BCM) | DC=9, RST=22, MOSI=10, SCK=11, CS=8. |
5. Recommended Paths Forward
If the "Zero Feed-in" automation is the priority, these are the only viable ways to view your data:
-
The Web Dashboard: Since you are on a Pi 2, running a lightweight Flask web server allows you to see the status on your phone or laptop without using any GPIO pins for display.
-
HDMI Status Screen: Since you have the "Desktop" version of Trixie, you can auto-launch a full-screen Python/Tkinter window on your HDMI monitor to show the power stats.
-
Hardware Upgrade: Replace the 2015 KeDei with a modern I2C OLED (SSD1306) or a Waveshare SPI display that has native driver support in the 2025 Linux kernel.
Would you like me to help you set up the "Auto-Launching HDMI Dashboard" since you already have the Raspberry Pi Desktop environment running?